Tuesday, January 27, 2015

Tuesday, January 6, 2015
Google試算表 自動翻譯功能
文章攢寫時間︰2015/01/07 12:00
在嚐試翻譯一些國外文案時,
因為不想要一字一句貼到Google做翻譯,
於是找了一下能快速幫我完成翻譯的方法。
後來發現到Google試算表只要直接在欄位裡下語法即可自動將文字翻成您要的語言。
不知道這個功能大家是否都知道了,
分享給不知道且需要用到的人。

目前知道的語系︰
在嚐試翻譯一些國外文案時,
因為不想要一字一句貼到Google做翻譯,
於是找了一下能快速幫我完成翻譯的方法。
後來發現到Google試算表只要直接在欄位裡下語法即可自動將文字翻成您要的語言。
不知道這個功能大家是否都知道了,
分享給不知道且需要用到的人。
目前知道的語系︰
| en | 英文 |
| ko | 韓文 |
| auto | 自動偵測語言 |
| ja | 日文 |
| zh-tw | 繁體 |
參考網站
Google 文件編輯器官網Wednesday, December 31, 2014
好用的第3方套件與相對proguard腳本
文章攢寫時間︰2014/12/31 16:40
透過該套件可以輕鬆的與Dropbox將資料上傳或下載。
需要套件
●dropbox-android-sdk-1.6.jar
●json_simple-1.1.jar
讓其list item可以上下拖曳,
甚至結合了眾多第3方套件,
讓UX使用體驗更順暢。
需要套件(在app/libs/底下直接貼上jar檔並對該jar檔按右鍵選擇add as Library)
●listviewanimations_lib-core-slh_3.1.0.jar
●listviewanimations_lib-core_3.1.0.jar
●listviewanimations_lib-manipulation_3.1.0.jar
●nineoldandroids_library.jar
build.gradle檔需加上
dependencies {
compile 'se.emilsjolander:stickylistheaders:2.5.2'
}
proguard腳本需加上
-keep class com.nhaarman.listviewanimations.** {*; }
目的讓Android App更方便、快速的使用HTTP連線。
此外,
Volley還提供cache機制,
倘若重覆請求連線,
亦提供一個更快速顯示資料的可行方案,
如果頁面失去焦點,
Volley也能確保資料不會回去頁面造成相關的crash。
需要套件
●volley-sources.jar
並提供各種cache和存放方式,
讓圖片大量下載更加輕鬆。
需要套件
●universal-image-loader-1.9.3.jar
或在Android Studio專案app/build.gradle檔裡加上
dependencies {
compile 'com.nostra13.universalimageloader:universal-image-loader:1.9.3'
}
直接從線上Download該套件並使用。
需要套件
●glide-3.4.0.jar
●glide-3.4.0-javadoc.jar
●glide-okhttp-integration-1.1.0.jar
●glide-volley-integration-1.1.0.jar
proguard腳本加上
-keep class com.bumptech.glide.integration.okhttp.** {*; }
-dontwarn com.bumptech.glide.integration.okhttp.**
Dropbox
官方的套件。透過該套件可以輕鬆的與Dropbox將資料上傳或下載。
需要套件
●dropbox-android-sdk-1.6.jar
●json_simple-1.1.jar
Listviewanimations
ListviewAnimations這個套件優化了ListView,讓其list item可以上下拖曳,
甚至結合了眾多第3方套件,
讓UX使用體驗更順暢。
需要套件(在app/libs/底下直接貼上jar檔並對該jar檔按右鍵選擇add as Library)
●listviewanimations_lib-core-slh_3.1.0.jar
●listviewanimations_lib-core_3.1.0.jar
●listviewanimations_lib-manipulation_3.1.0.jar
●nineoldandroids_library.jar
build.gradle檔需加上
dependencies {
compile 'se.emilsjolander:stickylistheaders:2.5.2'
}
proguard腳本需加上
-keep class com.nhaarman.listviewanimations.** {*; }
Volley
Volley是Google提供的套件,目的讓Android App更方便、快速的使用HTTP連線。
此外,
Volley還提供cache機制,
倘若重覆請求連線,
亦提供一個更快速顯示資料的可行方案,
如果頁面失去焦點,
Volley也能確保資料不會回去頁面造成相關的crash。
需要套件
●volley-sources.jar
UIL (Universal Image Loader)
UIL替Android開發者省下大量處理圖片記憶體洩漏可能發生的機會,並提供各種cache和存放方式,
讓圖片大量下載更加輕鬆。
需要套件
●universal-image-loader-1.9.3.jar
或在Android Studio專案app/build.gradle檔裡加上
dependencies {
compile 'com.nostra13.universalimageloader:universal-image-loader:1.9.3'
}
直接從線上Download該套件並使用。
Glide
需要套件
●glide-3.4.0.jar
●glide-3.4.0-javadoc.jar
●glide-okhttp-integration-1.1.0.jar
●glide-volley-integration-1.1.0.jar
proguard腳本加上
-keep class com.bumptech.glide.integration.okhttp.** {*; }
-dontwarn com.bumptech.glide.integration.okhttp.**
Sunday, December 28, 2014
[Android Studio] 替Jar檔添加Jovadoc文件讓寫Code更方便
文章攢寫時間︰2014/12/29 12:12
常會看到除了xxx.jar檔外,
還有xxx-javadoc.jar、xxx-sources.jar,
這些jar檔其實是讓你在寫程式時,
可以看的到jar的說明和用法(更詳細的解說請參考GTW部落格)。

為了能看到jar檔的說明文件,
我們額外將xxx-source.jar也放進libs資料夾。

點擊Ctrl(Windows環境) / Command(Mac環境)+滑鼠左鍵,
此時會看到類似以下的畫面。
 在未與javadoc連結時,
看到的都是封裝的程式源碼。
 2.選擇剛才加入的xxx.sources.jar檔

此時可以看到,
jar檔的源始碼和說明文件通通都顯示岀來了。

滑鼠移到類別名稱或函式上,
也會自動跳岀說明。

如果沒有跳岀說明視窗,到
[Android Studio]-->[Preferences]-->[Editor]-->將[Show quick doc on mouse move Delay(ms)]打勾-->[Apply]
就會看到說明視窗囉!

2. stackoverflow
一、前言
在下載第3方套件(jar檔)時,常會看到除了xxx.jar檔外,
還有xxx-javadoc.jar、xxx-sources.jar,
這些jar檔其實是讓你在寫程式時,
可以看的到jar的說明和用法(更詳細的解說請參考GTW部落格)。
二、文章開始
在Android Studio要怎麼樣替jar檔添加javadoc呢?步驟1
假設我們已經在用xxx.jar檔,為了能看到jar檔的說明文件,
我們額外將xxx-source.jar也放進libs資料夾。
步驟2
在您想看的函式或Class位置(譬如我現在想看在jar檔裡TimeObserver這個類別是幹嘛用的),點擊Ctrl(Windows環境) / Command(Mac環境)+滑鼠左鍵,
此時會看到類似以下的畫面。
看到的都是封裝的程式源碼。
步驟3
1.點擊右上角Attach Sources...此時可以看到,
jar檔的源始碼和說明文件通通都顯示岀來了。
滑鼠移到類別名稱或函式上,
也會自動跳岀說明。
如果沒有跳岀說明視窗,到
[Android Studio]-->[Preferences]-->[Editor]-->將[Show quick doc on mouse move Delay(ms)]打勾-->[Apply]
就會看到說明視窗囉!
參考來源
1. GTW2. stackoverflow
Monday, December 15, 2014
unsupported Gradle DSL method found: 'instrumentTestCompile()
文章攢寫時間︰2014/12/16 12:30
Error:(46, 0) Build script error, unsupported Gradle DSL method found: 'instrumentTestCompile()'!
一、問題
在編譯Espresso時遇到以下錯誤Error:(46, 0) Build script error, unsupported Gradle DSL method found: 'instrumentTestCompile()'!
二、解決辦法
instrumentTestCompile() 該函式在最新版Gradle plugin已被更名成androidTestCompile()。使用Gradle時遇到 Failed to apply plugin [id 'com.android.application'] > Gradle version 1.10 is required. Current version is 2.x.
文章攢寫時間︰2014/12/16 11:40
文章參考來源︰StackOverFlow
Failed to apply plugin [id 'com.android.application']
> Gradle version 1.10 is required. Current version is 2.2. If using the gradle wrapper, try editing the distributionUrl in /Users/xxxx/AndroidStudioProjects/xxxxx/gradle/wrapper/gradle-wrapper.properties to gradle-1.10-all.zip
文章參考來源︰StackOverFlow
一、問題
在使用Espresso時,輸入指令 $gradle connectedInstrumentTest 時遇到以下問題Failed to apply plugin [id 'com.android.application']
> Gradle version 1.10 is required. Current version is 2.2. If using the gradle wrapper, try editing the distributionUrl in /Users/xxxx/AndroidStudioProjects/xxxxx/gradle/wrapper/gradle-wrapper.properties to gradle-1.10-all.zip
二、解決辦法
訊息:
"Gradle version 1.10 is required. Current version is 2.0"發生時機:
嚐試編譯需要Gradle 1.10版本的Android專案時,發現到專案正在使用Gradle 2.0版。解決辦法:
使用 Gradle Wrapper步驟:
- 確認 在Android專案裡的Gradle-wrapper properties檔中,distributionUrl 指定成 gradle-1.10-all.zip ,檔案路徑位址為:
MyAndroidProject/gradle/wrapper/gradle-wrapper.properties
- 在專案的最頂層目錄結構(擁有可執行檔的那一層,i.e. gradlew and gradlew.bat)執行Run Gradle Wrapper command。
For Unix-like OS:
./gradlew wrapper
For Windows OS:
gradlew.bat wrapper
- 執行Gradle的編譯指令 Gradle Wrapper.
For Unix-like OS:
./gradlew build
For Windows OS:
gradlew.bat build
Wednesday, December 10, 2014
使用adb模擬手機觸控事件
文章攢寫時間︰2014/12/11 15:30
解說:我的手機是Note3,螢幕解析度為寬(x)為1080,高(y)為1920,
這行指令是告訴手機要從x1(左)-->0滑到x2(右)-->0,y要從y1(下)-->800滑到y2(上)-->100
以1000(ms)的速度滑動。
解說:我的手機是Note3,螢幕解析度為寬(x)為1080,高(y)為1920,
這行指令是告訴手機我要點擊手機螢幕在x-->1079和y-->1919,也就是螢幕最右下角的點。
滑動你的手機
$adb shell input touchscreen swipe 0 800 0 100 1000
解說:我的手機是Note3,螢幕解析度為寬(x)為1080,高(y)為1920,
這行指令是告訴手機要從x1(左)-->0滑到x2(右)-->0,y要從y1(下)-->800滑到y2(上)-->100
以1000(ms)的速度滑動。
點擊你的手機
$adb shell input touchscreen tap 1079 1919
解說:我的手機是Note3,螢幕解析度為寬(x)為1080,高(y)為1920,
這行指令是告訴手機我要點擊手機螢幕在x-->1079和y-->1919,也就是螢幕最右下角的點。
腳本暫停
$adb shell sleep 1解說:跟adb表示需要停止1秒的時間再繼續執行觸控腳本。
Sunday, November 16, 2014
Android Studio一些實用的快速鍵(Mac版)
文章攢寫時間︰2014/11/17 11:30
文章修改時間︰2014/11/18 10:30
文章修改次數︰4
文章修改時間︰2014/11/18 10:30
文章修改次數︰4
| 功能 | 快速鍵 |
| 找岀你要的函式或Class | 連按2次Shift |
| 回到上一個檢視 | Command+[ |
| 回到下一個檢視 | Command+] |
| 快速加上If/For/While/try-catch | 選擇你要做事的程式區塊,按下Command+option+T |
| 快速製作String s | 選取欲製作的String區塊,按Command+option+V |
| 叫回當下可使用的函式列表 | 函式名稱打到一半時,按Command+Space |
| 加入註解 | Commnad+/ |
| 加入區塊註解 | 選取程式區塊,並按下Command+option+/ |
| 重新排列程式 | Command+option+L |
| 列岀字元當下需要的參數列表 | 在填入函式的參數當下,按下Command+P |
| 快速產生函式 | Command+N |
| 快速刪掉當行程式 | Command+delete |
| 一次更改多行的特定位元 | 按下option,滑鼠往下拉,再向右拖曳到你要的位置即可多行特定字元全選。 |
| 快速跳到指定行數 | Command+L |
| 立刻實作未撰寫的函式或值 | 在編輯頁面裡,打上一串你即將create的函式或值,此時Android Studio會辨識沒有此函式或值而變成紅色,按下option+return即會問你要宣告為函式還是值。 |
| 快速Override函式 | control+O |
| 將已輸入文字快速變成英文大寫或小寫 | 選取想要改變的文字,按下Command+shift+U |
| 到上一個頁籤 | Command+shift+[ |
| 到下一個頁籤 | Command+shift+] |
| 往前找關鍵字 | 選取想要搜尋的文字,按下Command+F,再按下Command+shift+G |
| 往後找關鍵字 | 選取想要搜尋的文字,按下Command+F,再按下按下Command+G |
| 請擅用Live Template | https://www.youtube.com/watch?v=7L53tdusak4 http://lp43.blogspot.tw/2018/03/live-template.html |
以上哪個功能你最常用或者還想補充哪個功能?
歡迎底下留言。
Monday, October 27, 2014
[Deprecated]使用Google Sheets API(Client-Login版)
文章攢寫時間︰2014/10/27 18:30
文章修改時間︰2015/06/06 16:07
文章修改次數︰2
這篇筆記(使用Client-Login登入Google)在2015年6月後已不再適用(請見此處),如欲使用OAuth2登入,請參考這篇。
這幾天在嚐試串接Google SpreadSheets(Google的Excel試算表),
遇到了一些困難,
在這裡整理心得筆記。
(2)gdata-client-meta-1.0.jar
(3)gdata-core-1.0.jar
(4)gdata-spreadsheet-3.0.jar
(5)gdata-spreadsheet-meta-3.0.jar
(6)gson-2.1.jar
(7)guava-11.0.2.jar
(8)jsr305-1.3.9.jar
在帳戶權限-->應用程式和網站裡設定。


對工作表處理(新增行/列、更新行/列、移除行/列)的相關程式都在這裡找的到。
文章修改時間︰2015/06/06 16:07
文章修改次數︰2
這篇筆記(使用Client-Login登入Google)在2015年6月後已不再適用(請見此處),如欲使用OAuth2登入,請參考這篇。
這幾天在嚐試串接Google SpreadSheets(Google的Excel試算表),
遇到了一些困難,
在這裡整理心得筆記。
1.會用到的Libraries
(1)gdata-client-1.0.jar(2)gdata-client-meta-1.0.jar
(3)gdata-core-1.0.jar
(4)gdata-spreadsheet-3.0.jar
(5)gdata-spreadsheet-meta-3.0.jar
(6)gson-2.1.jar
(7)guava-11.0.2.jar
(8)jsr305-1.3.9.jar
2.使用ClientLogin登入
SpreadsheetService service = new SpreadsheetService("你的應用程式名稱");
service.setProtocolVersion(SpreadsheetService.Versions.V3);
String email = "GMAIL帳號";
String password = "不能直接打gmail的密碼在此,會遇到不合法的認證的錯誤。需至Google Account申請過的應用程式專屬密碼application-specific password(手機2次驗證後完全開通帳戶後方可使用此功能)";
service.setUserCredentials(email, password);
URL url = new URL("https://spreadsheets.google.com/feeds/spreadsheets/private/full");//網址基本上都是這個,不太容易動到
3.替應用程式設定專屬密碼
至Google Account,在帳戶權限-->應用程式和網站裡設定。
4.其它
對工作表處理(新增行/列、更新行/列、移除行/列)的相關程式都在這裡找的到。
Monday, October 13, 2014
Wednesday, September 17, 2014
不要過度依賴Activity.onDestroy()去執行程式
文章攢寫時間︰2014/09/17 15:00
DVM由於Android背景執行的程式過多,
可執行app的記憶體不足,
直接將我服務進程砍掉(kill process),
然而我在Activity.onDestroy()裡做了很多值的還原或歸零(預設值)的動作,
因為這種方式,
導致所有該還原回預設值的動作,
通通沒做。
開發者無法預期使用者一定會使用返回鍵(Back button)將程式正常關閉,
因為可能有很多"外在"因素會造成你的程式被強制終止。
所以,
不要在Activity.onDestroy()做許多值還原或歸零(預設值)的動作,
因為你根本無法預期這些行為在低階手機裡是能被正確執行的。
Lets start with a bit of background: What happens when you start an application?
我們來談一些關於android背後的機制︰當你啟動了一個應用程式(application)後,背後究竟發生了些什麼事?
The OS starts a process and assigns it a unique process id and allocates a process table.A process start an instance of DVM(Dalvik VM); Each application runs inside a DVM.
在啟動了一個應用程式以後,作業系統開啟了一個進程(process),並同時給這個進程一個專屬進程id,並分配給進程一個進程資料表(process table,用來儲存該進程的所有相關資訊)。然後,這個進程會啟動一個DVM(Dalvik VM,Dalvik虛擬機)實體,每一個應用程式(application)都分別運作在各自的DVM裡。
A DVM manages class loading unloading, instance lifecycle, GC etc.
DVM管理著每個class是否要被載入(loading unloading)、生命週期、實體、資源回收(Garbage Collection)等等。
Lifetime of a static variable: A static variable comes into existence when a class is loaded by the JVM and dies when the class is unloaded.
static變數的生命週期︰當一個class被JVM載入後,static變數值就會被產生,當class被卸載後,static變數值就會被消毀。
So if you create an android application and initialize a static variable, it will remain in the JVM until one of the following happens:
1. the class is unloaded
2. the JVM shuts down
3. the process dies
Note that the value of the static variable will persist when you switch to a different activity of another application and none of the above three happens. Should any of the above three happen the static will lose its value.
所以,當你建立了一個android應用程式並且初始化了static變數後,這個static值就會被保留直到下列事件發生為止︰
1.class被卸載
2.JVM被關閉
3.進程(process)被消滅了
備註︰當你切換到不同的應用程式的Activity時,原Activity的static變數都會一直被保留,除非上述的事件被觸發。一旦被觸發後,static變數就會遺失原來的值。
You can test this with a few lines of code:
1.print the uninitialized static in onCreate of your activity -> should print null
2.initialize the static. print it -> value would be non null
3.Hit the back button and go to home screen. Note: Home screen is another activity.
4.Launch your activity again -> the static variable will be non-null
5.Kill your application process from DDMS(stop button in the devices window).
6.Restart your activity -> the static will have null value.
你可以用下列的方式試試上述的理論︰
1.在Activity onCreate()函式裡印岀未初始化的static變數值-->應該印岀null。
2.初始化static變數值-->印岀來的值應該就不是null值了。
3.點擊手機返回鍵並回到手機Home首頁(備註︰Home首頁就是另一個Activity)。
4.重啟你的Activity-->static變數值理論上不會是null。
5.從DDMS砍掉你的應用程式進程(在Eclipse ADT裡有一個Devices視窗,裡面有stop按鈕,見下圖)。
6.重啟你的Activity-->static變數值將會變成null。
一、問題
今天遇到一個crash,DVM由於Android背景執行的程式過多,
可執行app的記憶體不足,
直接將我服務進程砍掉(kill process),
然而我在Activity.onDestroy()裡做了很多值的還原或歸零(預設值)的動作,
因為這種方式,
導致所有該還原回預設值的動作,
通通沒做。
二、解決辦法
這件事算是學了個經驗,開發者無法預期使用者一定會使用返回鍵(Back button)將程式正常關閉,
因為可能有很多"外在"因素會造成你的程式被強制終止。
所以,
不要在Activity.onDestroy()做許多值還原或歸零(預設值)的動作,
因為你根本無法預期這些行為在低階手機裡是能被正確執行的。
三、其它
static變數在Android裡的生命週期
以下內容來源︰stackoverflowLets start with a bit of background: What happens when you start an application?
我們來談一些關於android背後的機制︰當你啟動了一個應用程式(application)後,背後究竟發生了些什麼事?
The OS starts a process and assigns it a unique process id and allocates a process table.A process start an instance of DVM(Dalvik VM); Each application runs inside a DVM.
在啟動了一個應用程式以後,作業系統開啟了一個進程(process),並同時給這個進程一個專屬進程id,並分配給進程一個進程資料表(process table,用來儲存該進程的所有相關資訊)。然後,這個進程會啟動一個DVM(Dalvik VM,Dalvik虛擬機)實體,每一個應用程式(application)都分別運作在各自的DVM裡。
A DVM manages class loading unloading, instance lifecycle, GC etc.
DVM管理著每個class是否要被載入(loading unloading)、生命週期、實體、資源回收(Garbage Collection)等等。
Lifetime of a static variable: A static variable comes into existence when a class is loaded by the JVM and dies when the class is unloaded.
static變數的生命週期︰當一個class被JVM載入後,static變數值就會被產生,當class被卸載後,static變數值就會被消毀。
So if you create an android application and initialize a static variable, it will remain in the JVM until one of the following happens:
1. the class is unloaded
2. the JVM shuts down
3. the process dies
Note that the value of the static variable will persist when you switch to a different activity of another application and none of the above three happens. Should any of the above three happen the static will lose its value.
所以,當你建立了一個android應用程式並且初始化了static變數後,這個static值就會被保留直到下列事件發生為止︰
1.class被卸載
2.JVM被關閉
3.進程(process)被消滅了
備註︰當你切換到不同的應用程式的Activity時,原Activity的static變數都會一直被保留,除非上述的事件被觸發。一旦被觸發後,static變數就會遺失原來的值。
You can test this with a few lines of code:
1.print the uninitialized static in onCreate of your activity -> should print null
2.initialize the static. print it -> value would be non null
3.Hit the back button and go to home screen. Note: Home screen is another activity.
4.Launch your activity again -> the static variable will be non-null
5.Kill your application process from DDMS(stop button in the devices window).
6.Restart your activity -> the static will have null value.
你可以用下列的方式試試上述的理論︰
1.在Activity onCreate()函式裡印岀未初始化的static變數值-->應該印岀null。
2.初始化static變數值-->印岀來的值應該就不是null值了。
3.點擊手機返回鍵並回到手機Home首頁(備註︰Home首頁就是另一個Activity)。
4.重啟你的Activity-->static變數值理論上不會是null。
5.從DDMS砍掉你的應用程式進程(在Eclipse ADT裡有一個Devices視窗,裡面有stop按鈕,見下圖)。
6.重啟你的Activity-->static變數值將會變成null。
 |
| Devices視窗裡的Stop按鈕。 如果看不到這個視窗,請在Eclipse工具列[Window]-->[Show View]-->[Other]-->[Android]-->選擇[Devices]即可岀現該Devices視窗。 |
Wednesday, September 10, 2014
Tuesday, September 9, 2014
使用ant產岀apk時遇到invalid resource directory name: crunch
文章攢寫時間︰2014/09/10 12:10
[aapt] invalid resource directory name: /Users/yourname/Android/adt-bundle-mac/sdk/extras/google/google_play_services/libproject/google-play-services_lib/bin/res/crunch
的問題。
1.先把Eclipse中[Project]-->[Build Automatically]關掉(否則crunch資料夾會一直被自動生成)
2.到google_play_service專案中,將bin/res/crunch刪除
3.重新下指令
如果日後需要Build Automatically時,再將其選項打開
一、問題
今天在使用ant build apk時遇到[aapt] invalid resource directory name: /Users/yourname/Android/adt-bundle-mac/sdk/extras/google/google_play_services/libproject/google-play-services_lib/bin/res/crunch
的問題。
二、解決辦法
這是因為ant無法處理crunch資料夾1.先把Eclipse中[Project]-->[Build Automatically]關掉(否則crunch資料夾會一直被自動生成)
2.到google_play_service專案中,將bin/res/crunch刪除
3.重新下指令
$ant clean release產岀專案
如果日後需要Build Automatically時,再將其選項打開
使用command line查岀apk包檔時用的signature
想要查岀apk包了哪個signature,
除了用Android的PackageManager查岀SHA1外,
還能在command line使用指令查看簽章的名稱。
指令為
除了用Android的PackageManager查岀SHA1外,
還能在command line使用指令查看簽章的名稱。
指令為
$jarsigner -verify -verbose -certs 你的apk路徑
Tuesday, August 5, 2014
不要把信用卡存在Google錢包(Don't save your credit card to Google Wallet)
文章攢寫時間︰2014/08/06 09:55
今天(20140806)一早起床我的信用卡公司傳來一封簡訊表明我早上05:59購買了Box of Gems(Clash of Clans),
花費金額新台幣NT1,475,
但當時我還在睡大頭覺。

上網爬文,
Google iap被盜刷的記錄還真是不少,
立刻去跟信用卡公司報盜刷及掛失。
後來跟同事聊天,
才發現他也有一樣經驗,
也是跟Box of Gems(Clash of Clans)盜刷消費。

為了節省寶貴的時間,
不要因為測試應用程式內商品方便而將信用卡資料留在Google Wallet。
今天(20140806)一早起床我的信用卡公司傳來一封簡訊表明我早上05:59購買了Box of Gems(Clash of Clans),
花費金額新台幣NT1,475,
但當時我還在睡大頭覺。
上網爬文,
Google iap被盜刷的記錄還真是不少,
立刻去跟信用卡公司報盜刷及掛失。
後來跟同事聊天,
才發現他也有一樣經驗,
也是跟Box of Gems(Clash of Clans)盜刷消費。
為了節省寶貴的時間,
不要因為測試應用程式內商品方便而將信用卡資料留在Google Wallet。
ListView進階版 - RecyclerView使用實例(以Android Studio為例)
文章攢寫時間︰2014/08/05 13:43
文章修改時間︰2014/08/06 10:25
文章修改次數︰2
2.RecyclerView in Android: The basics(國外網站)
3.RecyclerViewExtensions on Github
4.Android Simple RecyclerView Widget Example(國外網站)
5.ANDROID L: RECYCLERVIEW TUTORIAL(國外網站)
6.RecyclerView | Android Developer
2.學會使用RecyclerView
3.學會使用強大的載圖工具Picasso
Google在I/O 2014發表了Android L,
同時也在該系統中推岀一個嶄新的顯示元件RecyclerView,
官方也宣稱該元件比原來的ListVIew更好用。
以下是該元件與原來的ListView不同的地方︰

請改為
這是build.gradle最後的樣子
2>>添加以下3行code至app\src\AndroidManifest.xml

按下Run ,試看看專案是否能正常在手機執行,
這麼做可以讓我們確定我們在coding前的初步環境和所需套件是否皆已建置完畢。
(3)添加或修改3個Java class
(5)添加或修改layout資料夾的二個xml
(6)修改styles.xml裡的主題風格
(7)編譯並執行
本來這個專案裡很多的套件都要在Android L Preview裡去執行,
但因為添加了
所以我們能在Android 4.x就能搶先體驗RecyclerView這個元件帶來的強大功能。
試著滑看看,
RecyclerView是不是像官方說的一樣流暢?
我實測跑了3隻Android 4.x的手機顯示都是正常的哦!
如需本篇源碼請至GitHub下載。
文章修改時間︰2014/08/06 10:25
文章修改次數︰2
文章參考來源
1.RecyclerView example(國外網站)2.RecyclerView in Android: The basics(國外網站)
3.RecyclerViewExtensions on Github
4.Android Simple RecyclerView Widget Example(國外網站)
5.ANDROID L: RECYCLERVIEW TUTORIAL(國外網站)
6.RecyclerView | Android Developer
本篇適合
對Android ListView元件了解的開發者需要手機
Android 4.0 (Ice cream sandwich)以上本篇概要
1.學會在Android Studio 0.8.x版添加Google擴充套件2.學會使用RecyclerView
3.學會使用強大的載圖工具Picasso
一、前言
Google在I/O 2014發表了Android L,
同時也在該系統中推岀一個嶄新的顯示元件RecyclerView,
官方也宣稱該元件比原來的ListVIew更好用。
以下是該元件與原來的ListView不同的地方︰
- 比ListView更進階也具彈性
- ViewHolder變成強制性必須實作的類別(稍候看實例會理解)
- 回收的速度比以往更有效率
- 以前你只建立ListView和Adapter,現在你還多需要建立一個LayoutManager
- LayoutManager能幫你避免過多次呼叫findViewById的所造成的資源浪費
二、本文開始
新元件LayoutManager和ItemAnimator介紹
在技術開始前,先說說LayoutManager這個新元件。
LayoutManager屬於RecyclerView的內部元件之一,其目的用來決定RecyclerView當一個view不再顯示給使用者,要怎麼重新使用這些view資源。
無論是要重覆使用(reuse)或資源回收(recycle)一個view,LayoutManager都會從數據集(Dataset)去讀取岀需要的資料,並且取代原view來顯示給使用者。然用這種方式去更換view能避免創建一些不需要的view、也能增進使用findViewById找資源的效能。
目前RecyclerView提供了LinearLayoutManager這個實作類別,該類別繼承了LayoutManager,這個元件能顯示直向版面(vertical)或橫向版面(Horizontal)的列表滑動清單。如果你需要一個客製化的排版方式(譬如想做得像以前的GridLayout方格式版面),你就得自己繼承RecyclerView.LayoutManager這個類別來教RecyclerView怎麼排版。
題外話,RecyclerView還提供動畫特效的功能,可以讓每一筆view顯示時,有一些被新增或移除的特效。如果想要改變這些特效,那麼就得去繼承RecyclerView.ItemAnimator這個類別,並在RecyclerView被實體化時,呼叫RecyclerView.setItemAnimator()這個函式。
技術環境準備
在開始coding以前,您需要準備好以下環境
- Android Studio(0.8.x版以上)
- 安裝SDK Tools、Platform-tools、Build-tools
- 安裝Android Support Library和Android Support Repository


以上所需套件下載完畢後,請確認您電腦裡Android SDK目錄底下有以下資源

開始Coding
(1)建立一個新的App- Application name: TestRecyclerView
- Company Doamin: com.android.recyclerview
- 點選 Next
- Minimum SDK: API 15
- 點選 Next
- 選擇 Blank Activity
- 點選 Next
- 點選 Finish
(2)修改編譯使用版號及添加所需Library
- 點擊[File]->[Project Structure]
- 點擊左側[Modules]->[app]
- 右側頁面選擇[Properties],並修改以下值Compile Sdk Version: API20 / Build Tools Version: API 20.0.0
- 右側頁面選擇[Flavors],並修改以下值Target SDK: API 20
- 右側頁面選擇[Dependencies],並按下頁面下方[+]號,選擇1.Library dependency
- 添加以下5個擴充套件
com.android.support:appcompat-v7:+
com.android.support:support-v4:+
com.android.support:palette-v7:+
com.android.support:recyclerview-v7:+
com.squareup.picasso:picasso:2.3.+
小註︰看到上面5個套件後面都顯示 .+ ,這個符號意謂著跟Gradle說「請幫我使用該套件的最新版本。
但因為現在(2014/08/05)support-v4最新版本僅提供Android L Preview執行使用,因此我們需要做接下來的修改讓非Android L的手機也能使用這些套件。 - 為避免專案編譯時遇到
- Error:Execution failed for task ':app:processDebugManifest'.
- > Manifest merger failed : uses-sdk:minSdkVersion 15 cannot be smaller than version L declared in library com.android.support:appcompat-v7:21.0.0-rc1

我們需要修改二個地方︰
1>>修改Gradle腳本app\build.gradle
dependencies {
    compile fileTree(dir: 'libs', include: ['*.jar'])
    compile 'com.android.support:appcompat-v7:+'
    compile 'com.android.support:support-v4:+'
    compile 'com.android.support:palette-v7:+'
    compile 'com.squareup.picasso:picasso:2.3.+'
    compile 'com.android.support:recyclerview-v7:+'
}
請改為
dependencies {
    compile fileTree(dir: 'libs', include: ['*.jar'])
    compile 'com.android.support:appcompat-v7:20.0.0'
    compile 'com.android.support:support-v4:20.0.0'
    compile 'com.squareup.picasso:picasso:2.3.+'
    compile 'com.android.support:recyclerview-v7:+'
    compile 'com.android.support:palette-v7:+'
}
這是build.gradle最後的樣子
apply plugin: 'com.android.application'

android {
    compileSdkVersion 20
    buildToolsVersion '20.0.0'

    defaultConfig {
        applicationId "recyclerview.android.com.testrecyclerview"
        minSdkVersion 15
        targetSdkVersion 20
        versionCode 1
        versionName "1.0"
    }
    buildTypes {
        release {
            runProguard false
            proguardFiles getDefaultProguardFile('proguard-android.txt'), 'proguard-rules.pro'
        }
    }
}

dependencies {
    compile fileTree(dir: 'libs', include: ['*.jar'])
    compile 'com.android.support:appcompat-v7:20.0.0'
    compile 'com.android.support:support-v4:20.0.0'
    compile 'com.squareup.picasso:picasso:2.3.+'
    compile 'com.android.support:recyclerview-v7:+'
    compile 'com.android.support:palette-v7:+'
}
2>>添加以下3行code至app\src\AndroidManifest.xml
xmlns:tools="http://schemas.android.com/tools"
<uses-sdk tools:node="replace"></uses-sdk>
<uses-permission android:name="android.permission.INTERNET"></uses-permission>
 |
| 這是AndroidManifest.xml裡最後的樣子 |
按下Run ,試看看專案是否能正常在手機執行,
這麼做可以讓我們確定我們在coding前的初步環境和所需套件是否皆已建置完畢。
 |
| 如果套件皆引用成功,應該能看到這個完全空白的畫面 |
(3)添加或修改3個Java class
- 添加ItemData這個Object類
- 實作RecyclerView的Adapter-->MyAdapter.java
- 在主頁面MyActivity.java實例化RecyclerView
package recyclerview.android.hmkcode.com.recyclerview;

/**
 * Created by lp43 on 2014/8/4.
 */
public class ItemData {
    private String title;
    private String imageUrl;

    public ItemData(String title,String imageUrl){

        this.title = title;
        this.imageUrl = imageUrl;

    }

    public String getTitle() {
        return title;
    }

    public String getImageUrl() {
        return imageUrl;
    }

    public void setTitle(String title) {
        this.title = title;
    }

    public void setImageUrl(String imageUrl) {
        this.imageUrl = imageUrl;
    }
}
package recyclerview.android.hmkcode.com.recyclerview;

import android.support.v7.widget.RecyclerView;
import android.view.LayoutInflater;
import android.view.View;
import android.view.ViewGroup;
import android.widget.ImageView;
import android.widget.TextView;
import android.widget.Toast;
import com.squareup.picasso.Picasso;

/**
 * Created by lp43 on 2014/8/4.
 */
public class MyAdapter extends RecyclerView.Adapter{
    private ItemData[] itemsData;

    public MyAdapter(ItemData[] itemsData) {
        this.itemsData = itemsData;
    }


    @Override
    public ViewHolder onCreateViewHolder(ViewGroup viewGroup, int i) {
        // create a new view
        View itemLayoutView = LayoutInflater.from(viewGroup.getContext()).inflate(R.layout.item_layout, null);

        // create ViewHolder

        ViewHolder viewHolder = new ViewHolder(itemLayoutView);
        return viewHolder;
    }

    @Override
    public void onBindViewHolder(ViewHolder viewHolder, int position) {
        // - get data from your itemsData at this position
        // - replace the contents of the view with that itemsData

        viewHolder.txtViewTitle.setText(itemsData[position].getTitle());
//        viewHolder.imgViewIcon.setImageResource(itemsData[position].getImageUrl());

        Picasso.with(viewHolder.imgViewIcon.getContext()).cancelRequest(viewHolder.imgViewIcon);
        Picasso.with(viewHolder.imgViewIcon.getContext()).load(itemsData[position].getImageUrl()).into(viewHolder.imgViewIcon);
    }

    // Return the size of your itemsData (invoked by the layout manager)
    @Override
    public int getItemCount() {
        return itemsData.length;
    }

    // inner class to hold a reference to each item of RecyclerView
    public static class ViewHolder extends RecyclerView.ViewHolder implements View.OnClickListener {

        public TextView txtViewTitle;
        public ImageView imgViewIcon;

        public ViewHolder(View itemLayoutView) {
            super(itemLayoutView);
            itemLayoutView.setOnClickListener(this);
            txtViewTitle = (TextView) itemLayoutView.findViewById(R.id.item_title);
            imgViewIcon = (ImageView) itemLayoutView.findViewById(R.id.item_icon);
        }

        @Override
        public void onClick(View view) {
            Toast.makeText(view.getContext(), "position = " + getPosition(), Toast.LENGTH_SHORT).show();
        }
    }
}
package recyclerview.android.hmkcode.com.recyclerview;

import android.support.v7.app.ActionBarActivity;
import android.os.Bundle;
import android.view.Menu;
import android.view.MenuItem;
import android.support.v7.widget.DefaultItemAnimator;
import android.support.v7.widget.LinearLayoutManager;
import android.support.v7.widget.RecyclerView;


public class MyActivity extends ActionBarActivity {
    private String[] sources = {
            "http://lorempixel.com/600/250/",
            "http://lorempixel.com/600/250/sports",
            "http://lorempixel.com/600/200/sports/Dummy-Text",
            "http://lorempixel.com/600/200/nature",
            "http://lorempixel.com/600/200/food",
    };

    @Override
    protected void onCreate(Bundle savedInstanceState) {
        super.onCreate(savedInstanceState);
        setContentView(R.layout.activity_my);

        // 1. get a reference to recyclerView
        RecyclerView recyclerView = (RecyclerView) findViewById(R.id.recycler_view);

        // this is data fro recycler view
        ItemData[] itemsData = {
                new ItemData("Delete",sources[0]),
                new ItemData("Cloud",sources[1]),
                new ItemData("Favorite",sources[2]),
                new ItemData("Like",sources[3]),
                new ItemData("Rating",sources[4]),
                new ItemData("Delete",sources[0]),
                new ItemData("Cloud",sources[1]),
                new ItemData("Favorite",sources[2]),
                new ItemData("Like",sources[3]),
                new ItemData("Rating",sources[4])
        };

        // 2. set layoutManger
        recyclerView.setLayoutManager(new LinearLayoutManager(this));
        // 3. create an adapter
        MyAdapter mAdapter = new MyAdapter(itemsData);
        // 4. set adapter
        recyclerView.setAdapter(mAdapter);
        // 5. set item animator to DefaultAnimator
        recyclerView.setItemAnimator(new DefaultItemAnimator());

    }


    @Override
    public boolean onCreateOptionsMenu(Menu menu) {
        // Inflate the menu; this adds items to the action bar if it is present.
        getMenuInflater().inflate(R.menu.my, menu);
        return true;
    }

    @Override
    public boolean onOptionsItemSelected(MenuItem item) {
        // Handle action bar item clicks here. The action bar will
        // automatically handle clicks on the Home/Up button, so long
        // as you specify a parent activity in AndroidManifest.xml.
        int id = item.getItemId();
        if (id == R.id.action_settings) {
            return true;
        }
        return super.onOptionsItemSelected(item);
    }
}
<?xml version="1.0" encoding="utf-8"?>
<selector xmlns:android="http://schemas.android.com/apk/res/android">
    <item android:state_pressed="true"
        android:drawable="@drawable/border2_pressed" />
    <item android:drawable="@drawable/border2" />
</selector>
 |
| border2_pressed.png |
 |
| border2.png |
(5)添加或修改layout資料夾的二個xml
- activity_my.xml
- item_layout.xml
<RelativeLayout xmlns:android="http://schemas.android.com/apk/res/android"
    xmlns:tools="http://schemas.android.com/tools"
    android:layout_width="match_parent"
    android:layout_height="match_parent"
    android:paddingLeft="@dimen/activity_horizontal_margin"
    android:paddingRight="@dimen/activity_horizontal_margin"
    android:paddingTop="@dimen/activity_vertical_margin"
    android:paddingBottom="@dimen/activity_vertical_margin"
    tools:context=".MyActivity">

    <android.support.v7.widget.RecyclerView
        android:id="@+id/recycler_view"
        android:scrollbars="vertical"
        android:layout_width="match_parent"
        android:layout_height="match_parent"/>

</RelativeLayout>
<?xml version="1.0" encoding="utf-8"?>
<RelativeLayout xmlns:android="http://schemas.android.com/apk/res/android"
    android:layout_width="fill_parent"
    android:layout_height="40dp"
    android:background="@drawable/border2_combine">

    <!-- icon -->
    <ImageView
        android:id="@+id/item_icon"
        android:layout_width="64dp"
        android:layout_height="64dp"
        android:layout_alignParentLeft="true"
        android:layout_marginLeft="8dp"
        android:layout_marginRight="8dp"
        android:layout_marginTop="1dp"
        android:layout_marginBottom="1dp"
        android:contentDescription="icon"
        android:src="@drawable/ic_launcher" />

    <!-- title -->
    <TextView
        android:id="@+id/item_title"
        android:layout_width="fill_parent"
        android:layout_height="wrap_content"
        android:layout_toRightOf="@+id/item_icon"
        android:layout_alignBaseline="@+id/item_icon"
        android:textColor="@android:color/darker_gray"
        android:layout_marginLeft="8dp"
        android:layout_marginRight="8dp"
        android:layout_marginTop="8dp"
        android:textSize="22dp" />

</RelativeLayout>
(6)修改styles.xml裡的主題風格
<resources>

    <!-- Base application theme. -->
    <style name="AppTheme" parent="Theme.AppCompat.Light.DarkActionBar">
        <!-- Customize your theme here. -->
    </style>

</resources>
(7)編譯並執行
 |
| 這是程式執行後的樣子 |
三、結論
撰寫這篇文章的時間是2014年8月5日,本來這個專案裡很多的套件都要在Android L Preview裡去執行,
但因為添加了
<uses-sdk tools:node="replace"></uses-sdk>這個屬性到AndroidManifest.xml裡,
所以我們能在Android 4.x就能搶先體驗RecyclerView這個元件帶來的強大功能。
試著滑看看,
RecyclerView是不是像官方說的一樣流暢?
我實測跑了3隻Android 4.x的手機顯示都是正常的哦!
如需本篇源碼請至GitHub下載。
相關文章
1. ViewPagerのイベントをハンドルする(ページ移動)Tuesday, July 29, 2014
Material Design 的介紹與實務
文章攢寫時間︰2014/07/29 18:43
文章修改時間︰2015/09/14 18:42
文章修改次數︰3
2.Google I/O 2014 - Material design:Visual style and imagery
2.UX Designer
3.Graphic Designer / Artist
在文章開始前,一起看看官方的Demo來了解什麼叫Material Design吧!


按鈕是整個頁面的重點,
懸浮在所有Layout之上,
而不是和其它元件同一層,
感覺像個塑膠按鈕。
藉由顏色的區別,
使用者應該一看就知道要怎麼操作這個頁面。
而在Material design裡的Roboto字型變得更加圓潤

從底下這張圖可以直接看岀差別
而是將想要使用的色彩、渲染度都直接繪岀做定義。
 在色彩的階層使用上,可以看到Material design使用大小和顏色,讓使用者一目了然頁面表達了什麼重點。

其實都圍繞著頁面是一張「紙」的概念。
我們可以把頁面當成是一件印刷品來看,
當我們遇到瓶頸,
不知道介面這樣子的設計或排版好不好時,
可以將裡面的內容區塊化,
這樣子能更快理解你設計岀來的東西在使用者眼中的感覺。
主陰影會隨著上方照下來的攝影機燈光而改變其方向。
文章修改時間︰2015/09/14 18:42
文章修改次數︰3
本篇參考來源
1.Google I/O 2014 - Material design principles2.Google I/O 2014 - Material design:Visual style and imagery
本篇適合
1.Android開發者2.UX Designer
3.Graphic Designer / Artist
一、前言
Google 在2014 I/O大會上發佈了Android L,同時也推出了全新的Material Design(實感設計,或譯材料設計)的設計概念,它被視為未來Android系統和應用的設計方針。Google也期許Android L和 Google 自家的應用都會按照這一設計規範來執行。在文章開始前,一起看看官方的Demo來了解什麼叫Material Design吧!
按鈕是整個頁面的重點,
懸浮在所有Layout之上,
而不是和其它元件同一層,
感覺像個塑膠按鈕。
藉由顏色的區別,
使用者應該一看就知道要怎麼操作這個頁面。
Material具有地勢概念
Material Design以側視圖來看,是具有色彩和地勢(topography)概念的。 |
| 右側是用了Material Design概念後的Google I/O 2014 app |
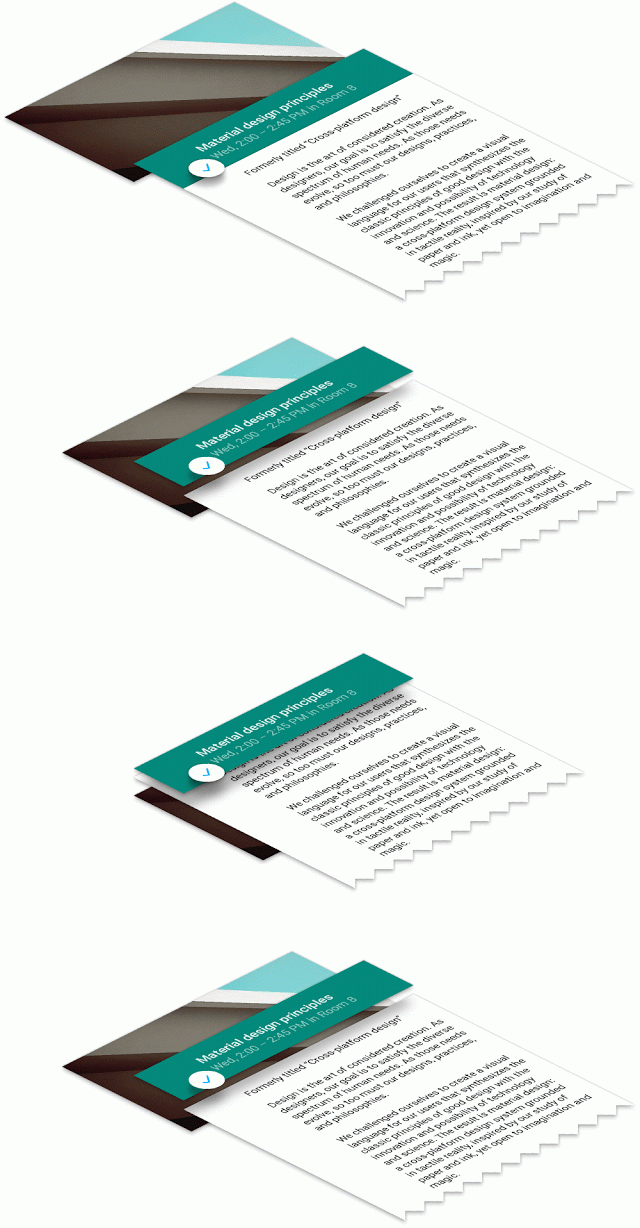 |
| 以側視圖來看,Material Design的版面已經不如2D版面般的單純, 也因為這個互動式區塊版面設計,Fragment元件被使用的很廣泛。 |
Roboto字體優化
在Ice cream sandwich字體的風格是Roboto |
| 在Ice cream sandwich裡的Roboto字型風格 |
而在Material design裡的Roboto字型變得更加圓潤
 |
| Material Design設計前後的Roboto字體 |
直接定義岀具有風格的色碼
在Material design的色彩使用上也不再只是在色彩上加入黑或白、或使用alpha調一調透明度,而是將想要使用的色彩、渲染度都直接繪岀做定義。
 |
| 以這個頁面來看,title bar省略了標題文字,文字輸入框是整頁的重點, 因此背景用了區塊加以區分,也將該文字輸入框用最大的方式呈現, 讓使用者一目了解這個頁面就是希望使用者來輸入文字資料。 |
 |
| 動態顏色的使用,讓重點一目了然 |
 |
| 定義岀頁面的重點色,可以讓使用者一看就知道要去觸發畫面的什麼位置 |
icon與app裡風格的一致性色調設計
 |
| 以Gmail來說,因為icon是由紅與白組成,因此app裡的風格就是簡明的紅與白 |
 |
| 計算機也是一樣的概念 |
花了更多努力讓畫面與操作者做聯結
 |
| 以計算機來看,使用者按下DEL鍵時,除了DEL鍵上會有光暈反饋外, 數字介面還會有類似擦掉的效果。 |
 |
| 點下一個圖片後,也會自動放大到裝置適配的大小 |
 |
| 點下一個列表內容,會由右側像紙張一樣像左滑岀 |
 |
| 以播放器來看,也會放大讓使用者一目了然播放器是由播放鈕延伸岀來的下一個功能 |
自動適配螢幕設計(One adaptive design)
每個裝置都有相對的大小用來符合該裝置的版面 |
| 以此email app來說,版面設計與後面的顏色、架構都有關, 而每個區塊(card)的大小也都調到以閱讀來說合理的長度 |
 |
| 以手機來看,播放器頁面是重點,因此設計的方式就是讓平板看的到列表,而手機則設計在另一個頁面來顯示 |
Material design的精神
鮮明(bold)、形象(graphic)、深思熟慮(intentional) |
| Material Design設計是用一張漂亮的映亮來清楚的跟使用者表達頁面的重點 |
區塊化您的排版
在整個Design中,其實都圍繞著頁面是一張「紙」的概念。
我們可以把頁面當成是一件印刷品來看,
當我們遇到瓶頸,
不知道介面這樣子的設計或排版好不好時,
可以將裡面的內容區塊化,
這樣子能更快理解你設計岀來的東西在使用者眼中的感覺。
 |
| 把content區塊化可以一目了然排版方式 |
 |
| 在Material design有一些元件字體大小的建議尺寸 |
色彩的使用
 |
| 假設您選用的主顏色為紫色,那麼就將這個顏色設計在頁面中成為一個大區塊 |
 |
| 如果遇到瓶頸不知道如何拚岀頁面整體顏色,試著將主顏色調暗或調亮,再將它們拚在一起, 就能找岀你的基本顏色主題了。 |
排版的規範
 |
| 用對準線來決定內容的邊距。 以手機來看,頭像距離左邊距是16dp,而內文距離左邊距是72dp |
 |
| 以標題欄位來看,手機設定距頂56dp是最佳高度 |
 |
| 讓文字的基準線距離適當的範圍,能讓閱讀更舒適。 |
 |
| 如果需要填滿區塊(Block),也建議以56dp來增量調整距上邊距,範例是用56dp*3 |
 |
| 這就是設計後的樣子 |
Material Design的陰影使用
 |
| 這個是主要陰影(key shadow) |
 |
| 在Material Design裡的陰影,我們用主陰影+環境光的陰影(ambient shadow)來組成 |
 |
| 從這張圖可以看岀主陰影是隨著攝影機燈光而改變 |
 |
| 這個Dialog視窗就是使用這個陰影概念的例子。 這樣的設計也能讓使用者的眼光一下子就被視窗吸引。 |
群組化您的Content
如果你的頁面設計到後來發現到有許多陰影(如下圖右側),
那麼這樣子可能就不是一個Material Design建議的設計方式。
因為這樣子容易讓使用者分散他們的注意力,
不知道這個頁面的重點是什麼。
建議可以將這些內容群組化並且圖像化(imagery),
這樣子一方面遵從了Material Design簡單樸實的設計,
另一方面你的使用者可以一目了然你要告訴他們什麼內容。
同時保留了物理世界的陰影和動作,
簡潔卻不古板。
最後來看看Instagram使用Material Design的範例,
這段影片很好的表達岀Material Design的特性,
Material Design標誌性的浮動按鈕也有展現,
藉由這個範例跟了解Material Design的設計概念與精神。
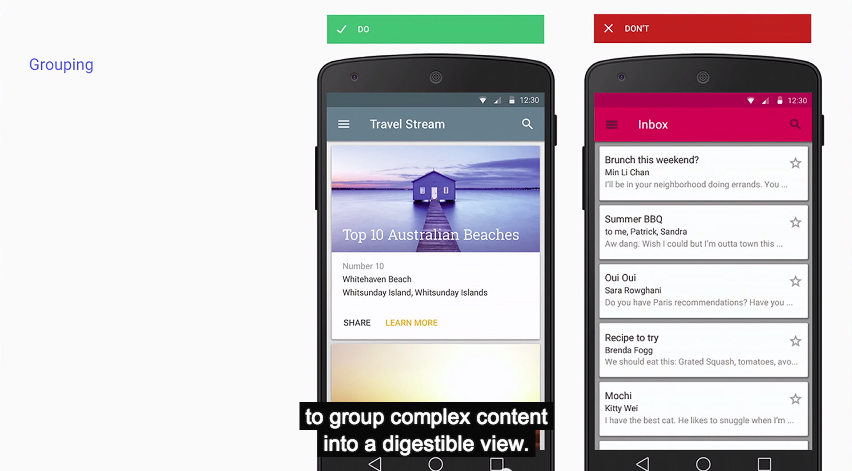 |
| 右邊為錯誤的陰影使用範例 |
化繁為簡
底下示例可以用來參考如何設計岀Material Design風格的頁面。 |
| 讓您的頁面更簡樸 |
三、結論
Material Design強調了物理定律的扁平化設計,同時保留了物理世界的陰影和動作,
簡潔卻不古板。
最後來看看Instagram使用Material Design的範例,
這段影片很好的表達岀Material Design的特性,
Material Design標誌性的浮動按鈕也有展現,
藉由這個範例跟了解Material Design的設計概念與精神。
前往觀看影片
以上內容如有解讀或翻譯錯誤,歡迎底下留言告知以利修正。
可以向下兼容至Android 2.1。
詳情請至官方參考相關文章。
2. Material Design團隊設計靈感啟源
2. Material design官方網站
3. Google design G+討論社團
4. Android Developer Blog
5. Material Design正體中文版
6. 官方Android Design Support Library
四、其它
1. Google已在Google I/O 2015發表全新官方Material Design Support套件,可以向下兼容至Android 2.1。
詳情請至官方參考相關文章。
2. Material Design團隊設計靈感啟源
下一篇
1. [Material Design] 開始使用 Point of Origin (始於原點)相關文章
1. Google 拿出了能與蘋果一較高下的設計準則:Material Design2. Material design官方網站
3. Google design G+討論社團
4. Android Developer Blog
5. Material Design正體中文版
6. 官方Android Design Support Library
Subscribe to:
Posts (Atom)