今天(2018/03/09)同事分享來的一個issue,因為公司需要發個人化推播,他發現收到推播的機臺彼此在錯亂。
釐淸了一下,錯亂造成的原因是因為都是用同一組Android id。
所以我們假設FCM底層在判斷機臺的方式,有使用Android ID當唯一值。
註︰在GCM的年代,官方有明文顯示不建議商務需求使用個人化推播。
Thursday, March 8, 2018

Tuesday, January 16, 2018
如何處理觸控事件
文章攢寫時間︰2018/01/16 11:54
本篇參考來源
1. STACKOVERFLOW
 When a touch event occurs, first everyone is notified of the event, starting at the Activity and going all the way to the view on top.
Then everyone is given a chance to handle the event, starting with the view on top and going all the way back to the Activity. So the Activity is the first to hear of it and the last to be given a chance to handle it.
當一個觸控事件發生時,每個元件都會在第1時間被通知,從Activity層開始層層往上,通知到最頂層的View。
每個元件在這段被通知的過程中,都有機會來處理這個事件,Activity是第一個聆聽到事件的元件,但是它卻是在最後才被處理到的元件。
If the Activity or some ViewGroup wants to handle the touch event right away (and not give anyone else down the line a chance at it) then it can just return true in its onInterceptTouchEvent().
如果Activity或某些ViewGroup想要立即處理觸控事件(並且不給其它元件任何處理的機會),那麼可以在該元件的onInterceptTouchEvent()中返回true。
If a View (or a ViewGroup) has an OnTouchListener, then the touch event is handled by OnTouchListener.onTouch(). Otherwise it is handled by onTouchEvent(). If onTouchEvent() returns true for any touch event, then the handling stops there. No one else down the line gets a chance at it.
如果一個View(或ViewGroup)想要擁有OnTouchListener事件,基本上該觸控事件是由OnTouchListener.onTouch()來處理,否則則由onTouchEvent()事件來處理。如果onTouchEvent()針對每個觸控事件皆返回true,那麼事件將被處理到該階層而停止,後面剩餘的元件將無法得到任何觸控的機會。
-------------------------------
More detailed explanation
詳細解說
The above diagram makes things a little more simple than they actually are. For example, between the Activity and ViewGroup A (the root layout) there is also the Window and the DecorView. I left them out above because we generally don't have to interact with them. However, I will include them below. The description below follows a touch event through the source code. You can click a link to see the actual source code.
下面的圖例也許能把整件事變得稍微簡單些,舉例來說,在Activity與ViewGroup A(根佈局)之間還有Window與DecorView。我們把它們排除在上面,因為我們一般來說不會與這兩個階層互動。不過,我會在下面的範例中引入它們。下面的描述是觸控事件的程式碼,你可以點擊連結來看源始碼。
1.The Activity's dispatchTouchEvent() is notified of a touch event. The touch event is passed in as a MotionEvent, which contains the x,y coordinates, time, type of event, and other information.
Activity的dispatchTouchEvent()被通知有一個觸控事件,這個觸控事件藉由MotionEvent傳入,過程中包含了x、y的坐標值、時間。事件類型與其它的信息。
2.The touch event is sent to the Window's superDispatchTouchEvent(). Window is an abstract class. The actual implementation is PhoneWindow.
觸發事件發到superDispatchTouchEvent()到Window階層,Window是一件抽象類別,實際實作的是PhoneWindow。
 3.The next in line to get the notification is DecorView's superDispatchTouchEvent(). DecorView is what handles the status bar, navigation bar, content area, etc. It is actually just a FrameLayout subclass, which is itself a subclass of ViewGroup.
接下來我們取到的通知是DecorView的superDispatchTouchEvent()。DecorView是處理上方狀態列(status bar) 、下方導覽列(navigation bar)以及內容...等等的東西。它實際上只是一個FrameLayout的子類別,它本身就是ViewGroup的子類。
4.The next one to get the notification (correct me if I'm wrong) is the content view of your activity. That is what you set as the root layout of your activity in xml when you create the layout in the Android Studio's Layout Editor. So whether you choose a RelativeLayout, a LinearLayout, or a ConstraintLayout, they are all subclasses of ViewGroup. And ViewGroup gets notified of the touch event in dispatchTouchEvent(). This is the ViewGroup A in my diagrams above.
下一個得到通知(如果我錯了請糾正我)的是你的Activity裡的content view。這個就是你在Android Studio佈局編輯器裡編輯的、你設為根佈局的layout xml。因此,無論你選擇竹旳是RelativeLayout、LinearLayout、或是ConstraintLayout,它們都隸屬於ViewGroup的子類別。ViewGroup在dispatchTouchEvent()中獲得到觸控事件。這是我上圖裡的ViewGroup A。
5.The ViewGroup will notify any children it has of the touch event, including any ViewGroup children. This is ViewGroup B in my diagrams above.
ViewGroup將會開始通知觸控事件至底下的任何子元件項目,這也包含了ViewGroup的所有子項。在圖例中我以ViewGoup B來做舉例。
6.Anywhere along the way, a ViewGroup can short-circuit the notification process by returning true for onInterceptTouchEvent().
在任何情況下,隸屬於ViewGroup的元件皆可透過onInterceptTouchEvent()回傳true來讓流程"短路"。
7.Assuming no ViewGroup cut the notifications short, the natural end of the line for the notifications is when the View's dispatchTouchEvent() get's called.
假設沒有ViewGroup讓通知流程縮短,那麼通知事件自然結束的點就是在View的dispatchTouchEvent()事件被調用的時候。
8.Now it is time, to start handling the events. If there is an OnTouchListener, then it gets the first chance at handling the touch event with onTouch(). Otherwise, the View's onTouchEvent() gets to handle it.
通知事件的流程到此結束,是時候開始往上處理觸控事件了。如果在View層有一個OnTouchListner,那麼它會在onTouch()中得到第1次的觸控處理的機會。否則會由View的onTouchEvent()來處理觸控事件。
9.Now all the ViewGroups recursively up the line get a chance to handle the touch event in the same way that View did. Although, I didn't indicate this in the diagram above, a ViewGroup is a View subclass, so everything I described about OnTouchListener.onTouch() and onTouchEvent() also applies to ViewGroups.
接下來所有的ViewGroups都像View層一樣,皆以遞迴的方式向上處理觸控事件。儘管我沒有在上圖指出ViewGroup是View的子類別,但我描述有關OnTouchListener.onTouch()和onTouchEvent()也皆適用於ViewGroups。
10.Finally, if no one else wanted it, the Activity also gets the last chance to handle the event with onTouchEvent().
1最後,如果沒有任何的元件需要它,Acitivy也會在onTouchEvent()中得到最後一次的機會來處理觸控事件。
FAQ
1.When would I ever need to override dispatchTouchEvent()?
我何時需要覆寫dispatchTouchEvent()?
答:
Probably you wouldn't need to, unless you need to do some extra routing that doesn't occur by default. To monitor touch event notifications, you can override onInterceptTouchEvent() instead.
也許你不需要這樣做,除非你需要做一些額外的路由,否則默認狀況下這個情況是不會發生的。要監控觸控事件,你可以覆寫onInterceptTouchEvent()即可。
2.When would I ever need to override onInterceptTouchEvent()?
我何時需要覆寫onInterceptTouchEvent()?
答:
If you just want to spy of the touch notifications that are coming in, you can do it here and return false.
如果你只是想監控正在進入的觸控事件,你可以在此時處理並返回false。
However, the main purpose of overriding this method is to let the ViewGroup handle a certain type of touch event while letting the child handle another type. For example, a ScrollView does this to handle scrolling while letting its child handle something like a Button click. Conversely, if the child view doesn't want to let its parent steal its touch event, it can call requestDisallowTouchIntercept().
但是,覆寫這個函式的主要目的是為了讓ViewGroup能處理特定類型的觸控事件,同時讓子元件處理其它類型的事件。舉例來說,ScrollView這樣子實作來處理滾動,同時它的子元件(像是Button)則是處理按鈕點擊事件。相反地,如果子視圖不想要讓父母竊取其觸控事件,則可以調用requestDisallowTouchIntercept()。
3.What are the touch event types?
觸控類型有哪些?
答:
The main ones are 主要的有
ACTION_DOWN - This is the start of a touch event. You should always return true for the ACTION_DOWN event in onTouchEvent if you want to handle a touch event. Otherwise, you won't get any more events delivered to you.
ACTION_DOWN - 這是觸控事件的開始,在onTouchEvent()裡ACTION_DOWN的時候你也許永遠要返回true。否則,你不會再收到任何更多的事件。
ACTION_MOVE - This event is continuously fired as you move your finger across the screen.
ACTION_MOVE - 當你的手指在螢幕上不斷的滑動時,該事件會不斷的被觸發。
ACTION_UP - This is the last event of a touch event.
ACTION_UP - 這是觸控事件的最後一個事件。
A runner up is ACTION_CANCEL. This gets called if a ViewGroup up the tree decides to intercept the touch event.
第二類型的是ACTION_CANCEL,如果ViewGroup樹狀上決定攔截觸控事件,則會收到該事件。
You can view the other kinds of MotionEvents here. Since Android is multi-touch, events are also fired when other fingers ("pointers") touch the screen.
你可以在這裡參考其它類型的MotionEvents,因為Android是多點觸控的,當其它手指("點擊")螢幕時,事件也會被觸發。
延伸閱讀
本篇參考來源
1. STACKOVERFLOW
文章開始
觸控頁面與元件的關係 When a touch event occurs, first everyone is notified of the event, starting at the Activity and going all the way to the view on top.
Then everyone is given a chance to handle the event, starting with the view on top and going all the way back to the Activity. So the Activity is the first to hear of it and the last to be given a chance to handle it.
當一個觸控事件發生時,每個元件都會在第1時間被通知,從Activity層開始層層往上,通知到最頂層的View。
每個元件在這段被通知的過程中,都有機會來處理這個事件,Activity是第一個聆聽到事件的元件,但是它卻是在最後才被處理到的元件。
If the Activity or some ViewGroup wants to handle the touch event right away (and not give anyone else down the line a chance at it) then it can just return true in its onInterceptTouchEvent().
如果Activity或某些ViewGroup想要立即處理觸控事件(並且不給其它元件任何處理的機會),那麼可以在該元件的onInterceptTouchEvent()中返回true。
If a View (or a ViewGroup) has an OnTouchListener, then the touch event is handled by OnTouchListener.onTouch(). Otherwise it is handled by onTouchEvent(). If onTouchEvent() returns true for any touch event, then the handling stops there. No one else down the line gets a chance at it.
如果一個View(或ViewGroup)想要擁有OnTouchListener事件,基本上該觸控事件是由OnTouchListener.onTouch()來處理,否則則由onTouchEvent()事件來處理。如果onTouchEvent()針對每個觸控事件皆返回true,那麼事件將被處理到該階層而停止,後面剩餘的元件將無法得到任何觸控的機會。
-------------------------------
More detailed explanation
詳細解說
The above diagram makes things a little more simple than they actually are. For example, between the Activity and ViewGroup A (the root layout) there is also the Window and the DecorView. I left them out above because we generally don't have to interact with them. However, I will include them below. The description below follows a touch event through the source code. You can click a link to see the actual source code.
下面的圖例也許能把整件事變得稍微簡單些,舉例來說,在Activity與ViewGroup A(根佈局)之間還有Window與DecorView。我們把它們排除在上面,因為我們一般來說不會與這兩個階層互動。不過,我會在下面的範例中引入它們。下面的描述是觸控事件的程式碼,你可以點擊連結來看源始碼。
1.The Activity's dispatchTouchEvent() is notified of a touch event. The touch event is passed in as a MotionEvent, which contains the x,y coordinates, time, type of event, and other information.
Activity的dispatchTouchEvent()被通知有一個觸控事件,這個觸控事件藉由MotionEvent傳入,過程中包含了x、y的坐標值、時間。事件類型與其它的信息。
2.The touch event is sent to the Window's superDispatchTouchEvent(). Window is an abstract class. The actual implementation is PhoneWindow.
觸發事件發到superDispatchTouchEvent()到Window階層,Window是一件抽象類別,實際實作的是PhoneWindow。
 3.The next in line to get the notification is DecorView's superDispatchTouchEvent(). DecorView is what handles the status bar, navigation bar, content area, etc. It is actually just a FrameLayout subclass, which is itself a subclass of ViewGroup.
接下來我們取到的通知是DecorView的superDispatchTouchEvent()。DecorView是處理上方狀態列(status bar) 、下方導覽列(navigation bar)以及內容...等等的東西。它實際上只是一個FrameLayout的子類別,它本身就是ViewGroup的子類。
4.The next one to get the notification (correct me if I'm wrong) is the content view of your activity. That is what you set as the root layout of your activity in xml when you create the layout in the Android Studio's Layout Editor. So whether you choose a RelativeLayout, a LinearLayout, or a ConstraintLayout, they are all subclasses of ViewGroup. And ViewGroup gets notified of the touch event in dispatchTouchEvent(). This is the ViewGroup A in my diagrams above.
下一個得到通知(如果我錯了請糾正我)的是你的Activity裡的content view。這個就是你在Android Studio佈局編輯器裡編輯的、你設為根佈局的layout xml。因此,無論你選擇竹旳是RelativeLayout、LinearLayout、或是ConstraintLayout,它們都隸屬於ViewGroup的子類別。ViewGroup在dispatchTouchEvent()中獲得到觸控事件。這是我上圖裡的ViewGroup A。
5.The ViewGroup will notify any children it has of the touch event, including any ViewGroup children. This is ViewGroup B in my diagrams above.
ViewGroup將會開始通知觸控事件至底下的任何子元件項目,這也包含了ViewGroup的所有子項。在圖例中我以ViewGoup B來做舉例。
6.Anywhere along the way, a ViewGroup can short-circuit the notification process by returning true for onInterceptTouchEvent().
在任何情況下,隸屬於ViewGroup的元件皆可透過onInterceptTouchEvent()回傳true來讓流程"短路"。
7.Assuming no ViewGroup cut the notifications short, the natural end of the line for the notifications is when the View's dispatchTouchEvent() get's called.
假設沒有ViewGroup讓通知流程縮短,那麼通知事件自然結束的點就是在View的dispatchTouchEvent()事件被調用的時候。
8.Now it is time, to start handling the events. If there is an OnTouchListener, then it gets the first chance at handling the touch event with onTouch(). Otherwise, the View's onTouchEvent() gets to handle it.
通知事件的流程到此結束,是時候開始往上處理觸控事件了。如果在View層有一個OnTouchListner,那麼它會在onTouch()中得到第1次的觸控處理的機會。否則會由View的onTouchEvent()來處理觸控事件。
9.Now all the ViewGroups recursively up the line get a chance to handle the touch event in the same way that View did. Although, I didn't indicate this in the diagram above, a ViewGroup is a View subclass, so everything I described about OnTouchListener.onTouch() and onTouchEvent() also applies to ViewGroups.
接下來所有的ViewGroups都像View層一樣,皆以遞迴的方式向上處理觸控事件。儘管我沒有在上圖指出ViewGroup是View的子類別,但我描述有關OnTouchListener.onTouch()和onTouchEvent()也皆適用於ViewGroups。
10.Finally, if no one else wanted it, the Activity also gets the last chance to handle the event with onTouchEvent().
1最後,如果沒有任何的元件需要它,Acitivy也會在onTouchEvent()中得到最後一次的機會來處理觸控事件。
FAQ
1.When would I ever need to override dispatchTouchEvent()?
我何時需要覆寫dispatchTouchEvent()?
答:
Probably you wouldn't need to, unless you need to do some extra routing that doesn't occur by default. To monitor touch event notifications, you can override onInterceptTouchEvent() instead.
也許你不需要這樣做,除非你需要做一些額外的路由,否則默認狀況下這個情況是不會發生的。要監控觸控事件,你可以覆寫onInterceptTouchEvent()即可。
2.When would I ever need to override onInterceptTouchEvent()?
我何時需要覆寫onInterceptTouchEvent()?
答:
If you just want to spy of the touch notifications that are coming in, you can do it here and return false.
如果你只是想監控正在進入的觸控事件,你可以在此時處理並返回false。
However, the main purpose of overriding this method is to let the ViewGroup handle a certain type of touch event while letting the child handle another type. For example, a ScrollView does this to handle scrolling while letting its child handle something like a Button click. Conversely, if the child view doesn't want to let its parent steal its touch event, it can call requestDisallowTouchIntercept().
但是,覆寫這個函式的主要目的是為了讓ViewGroup能處理特定類型的觸控事件,同時讓子元件處理其它類型的事件。舉例來說,ScrollView這樣子實作來處理滾動,同時它的子元件(像是Button)則是處理按鈕點擊事件。相反地,如果子視圖不想要讓父母竊取其觸控事件,則可以調用requestDisallowTouchIntercept()。
3.What are the touch event types?
觸控類型有哪些?
答:
The main ones are 主要的有
ACTION_DOWN - This is the start of a touch event. You should always return true for the ACTION_DOWN event in onTouchEvent if you want to handle a touch event. Otherwise, you won't get any more events delivered to you.
ACTION_DOWN - 這是觸控事件的開始,在onTouchEvent()裡ACTION_DOWN的時候你也許永遠要返回true。否則,你不會再收到任何更多的事件。
ACTION_MOVE - This event is continuously fired as you move your finger across the screen.
ACTION_MOVE - 當你的手指在螢幕上不斷的滑動時,該事件會不斷的被觸發。
ACTION_UP - This is the last event of a touch event.
ACTION_UP - 這是觸控事件的最後一個事件。
A runner up is ACTION_CANCEL. This gets called if a ViewGroup up the tree decides to intercept the touch event.
第二類型的是ACTION_CANCEL,如果ViewGroup樹狀上決定攔截觸控事件,則會收到該事件。
You can view the other kinds of MotionEvents here. Since Android is multi-touch, events are also fired when other fingers ("pointers") touch the screen.
你可以在這裡參考其它類型的MotionEvents,因為Android是多點觸控的,當其它手指("點擊")螢幕時,事件也會被觸發。
延伸閱讀
- Android onTouchEvent Part 1, Part 2, and Part 3 (YouTube video - good summary of some of the links below)
- Mastering the Android Touch System (thorough video by Google developer)
- Android UI Internal : Pipeline of View's Touch Event Handling
- Managing Touch Events in a ViewGroup (Android docs)
- Input Events (Android docs)
- Gestures and Touch Events
Tuesday, January 3, 2017
關於android:clipToPadding
文章攢寫時間︰2017/01/04 11:48
本篇參考來源
1. android:clipToPadding属性的分析——以ListView的"别样"padding为例
2. android:clipToPadding和android:clipChildren
完整的xml檔如下
這個值做什麼用的呢? 直接看影片吧!
本篇參考來源
1. android:clipToPadding属性的分析——以ListView的"别样"padding为例
2. android:clipToPadding和android:clipChildren
本篇適合
1.Android開發者一、文章開始
不管在使用過去的ListView或現在的RecyclerView,很容易在xml檔裡遇到一個參數android:cliptopadding="true"
完整的xml檔如下
<android.support.v7.widget.recyclerview=""
    android:id="@+id/recyclerview"
    android:layout_height="match_parent"
    android:layout_width="match_parent"
    android:padding="16dp"/>
    android:cliptopadding="true"/>
這個值做什麼用的呢? 直接看影片吧!
Thursday, February 4, 2016
運行網頁遇到 Access-Control-Allow-Origin
問題
XMLHttpRequest cannot load http://xxxxx/xxx.html No 'Access-Control-Allow-Origin' header is present on the requested resource. Origin 'null' is therefore not allowed access.
解決辦法
html網頁不要放在本機跑
請放到Apache或其它已啟動之伺服器
Sunday, January 17, 2016
[Material Design] 開始使用 Point of Origin (始於原點)
文章攢寫時間︰2016/01/16 18:37
本篇參考來源
1. Android: An Introduction to Material Design
2.UX Designer
3.Graphic Designer / Artist
已事隔1年半之久,
這1年半裡發生了許多次的Android改版,
Google針對Material Design,
也開始透過Support Library(兼容性套件)的方式釋岀相關資源給大家,
因此,
在這邊跟老朋友們分享目前所認識的Material Design給老朋友知道了。
Poiint of Origin是我對Material Design的第1個認識,
任何點擊後展開的行為,
應該都要始於原點。
這種設計方式可以很淸楚的對使用者交待︰
「現在顯示岀來的新頁面,是從剛剛你點擊的地方延伸岀來的。」
底下提供一個範例︰
1. 使用者點擊頁面1裡RecyclerView的任一列表,開啟頁面2
2. 頁面2開啟後,顯示岀剛才使用者在頁面1點擊的列表其左側ImageView放大版

開始攢寫程式
1.攢寫FirstActivity
我們先創建第1個頁面,
將其命名為FirstActivity,
並在裡面宣告使用一組RecyclerView。
2.定義岀RecyclerView需要的MyAdapter
從上面被標註的Code看到了在開啟頁面前,
宣告了一個全新的元件Pair(配對)
from_A 這裡請傳入頁面A的View元件實體,範例裡傳入的是viewHolder.imgViewIcon
to_B 這裡請傳入頁面B在xml裡宣告的transitionName(識別標籤),範例裡傳入的是tImage
利用Pair,
Material Design便可以知道您想要從頁面1的A元件延展至頁面2的B元件上。
然後,
我們再將Pair透過兼容性套件提供的ActivityOptionsCompat元件,
轉成Android 5.0可以接收的Bundle,
最後,
利用兼容性套件提供的方法,
開啟頁面B。
註︰
為什麼利用兼容性套件的方式開啟新頁面而不直接startActivity()呢?
因為在Android Jelly Bean(SDK 16)開始,
startActivity()裡的參數才開始能接收bundle,
為了讓Code裡不用去區分SDK是否>16,
因此我們直接使用兼容性套件去做判斷。
3.做岀頁面2
頁面2就只是一個很基本放上ImageView的頁面
activity_sescond.xml︰
從上面標註起來的地方,
我們可以看到Pair最後一個傳入的參數transitionName(識別標籤)被宣告在頁面B的ImageView裡。
差不多Coding完畢,
執行看看效果︰
Material Design便能幫您做岀一組Point of Origin動畫。
很簡單吧?
Point of Origin僅在Android 5.0以上有作用。
查了一下底層,
主要是因為從Pair轉换岀來並塞給startActivity的Bundle在Android 5.0才開始對它做岀判斷並解析成動畫特效。
如果使用者的裝置在Android 5.0以下,
則仍會正常從頁面1開到頁面2,
只是Point of Origin的特效就不會岀現,
這邊可能要跟使用這個功能的開發者告知一聲。
附上本篇教學的原始碼
本篇參考來源
1. Android: An Introduction to Material Design
本篇適合
1.Android中級開發者2.UX Designer
3.Graphic Designer / Artist
一、前言
上次跟大家介紹Material Design(實感設計,或譯材料設計),已事隔1年半之久,
這1年半裡發生了許多次的Android改版,
Google針對Material Design,
也開始透過Support Library(兼容性套件)的方式釋岀相關資源給大家,
因此,
在這邊跟老朋友們分享目前所認識的Material Design給老朋友知道了。
二、文章開始
Point of Origin(始於原點,暫譯)
 |
| 始於原點 |
Poiint of Origin是我對Material Design的第1個認識,
任何點擊後展開的行為,
應該都要始於原點。
這種設計方式可以很淸楚的對使用者交待︰
「現在顯示岀來的新頁面,是從剛剛你點擊的地方延伸岀來的。」
底下提供一個範例︰
1. 使用者點擊頁面1裡RecyclerView的任一列表,開啟頁面2
2. 頁面2開啟後,顯示岀剛才使用者在頁面1點擊的列表其左側ImageView放大版

開始攢寫程式
1.攢寫FirstActivity
我們先創建第1個頁面,
將其命名為FirstActivity,
並在裡面宣告使用一組RecyclerView。
public class FirstActivity extends Activity {

    private String[] name = {
            "Umbrella Droid",
            "Box Droid",
            "Injured Droid",
            "Evil Droid",
            "Shadow Droid"
    };
    private int[] imgSmall = {
            R.drawable.droid1_s,
            R.drawable.droid2_s,
            R.drawable.droid3_s,
            R.drawable.droid4_s,
            R.drawable.droid5_s
    };
    private int[] imgLarge = {
            R.drawable.droid1_l,
            R.drawable.droid2_l,
            R.drawable.droid3_l,
            R.drawable.droid4_l,
            R.drawable.droid5_l
    };

    // this is data for recycler view
    ItemData itemsData[] = {
            new ItemData(name[0],   imgSmall[0], imgLarge[0]),
            new ItemData(name[1],   imgSmall[1], imgLarge[1]),
            new ItemData(name[2],   imgSmall[2], imgLarge[2]),
            new ItemData(name[3],   imgSmall[3], imgLarge[3]),
            new ItemData(name[4],   imgSmall[4], imgLarge[4]),
            new ItemData(name[0],   imgSmall[0], imgLarge[0]),
            new ItemData(name[1],   imgSmall[1], imgLarge[1]),
            new ItemData(name[2],   imgSmall[2], imgLarge[2]),
            new ItemData(name[3],   imgSmall[3], imgLarge[3]),
            new ItemData(name[4],   imgSmall[4], imgLarge[4]),
            new ItemData(name[0],   imgSmall[0], imgLarge[0]),
            new ItemData(name[1],   imgSmall[1], imgLarge[1]),
            new ItemData(name[2],   imgSmall[2], imgLarge[2]),
            new ItemData(name[3],   imgSmall[3], imgLarge[3]),
            new ItemData(name[4],   imgSmall[4], imgLarge[4]),
            new ItemData(name[0],   imgSmall[0], imgLarge[0]),
            new ItemData(name[1],   imgSmall[1], imgLarge[1]),
            new ItemData(name[2],   imgSmall[2], imgLarge[2]),
            new ItemData(name[3],   imgSmall[3], imgLarge[3]),
            new ItemData(name[4],   imgSmall[4], imgLarge[4])
    };

    @Override
    protected void onCreate(Bundle savedInstanceState) {
        super.onCreate(savedInstanceState);
        setContentView(R.layout.activity_first);

        RecyclerView recyclerView = (RecyclerView) findViewById(R.id.recycler_view);
        recyclerView.setLayoutManager(new LinearLayoutManager(this));
        MyAdapter mAdapter = new MyAdapter(this, itemsData);
        recyclerView.setAdapter(mAdapter);
        recyclerView.setItemAnimator(new DefaultItemAnimator());

    }
}
2.定義岀RecyclerView需要的MyAdapter
public class MyAdapter extends RecyclerView.Adapter<MyAdapter.ViewHolder>{
    private static Context context;
    private static ItemData[] itemsData;

    public MyAdapter(Context cnx, ItemData[] itemsData) {
        this.context = cnx;
        this.itemsData = itemsData;
    }

    @Override
    public ViewHolder onCreateViewHolder(ViewGroup viewGroup, int i) {
        // create a new view
        View itemLayoutView = LayoutInflater.from(viewGroup.getContext()).inflate(R.layout.item_layout, null);

        // create ViewHolder
        ViewHolder viewHolder = new ViewHolder(itemLayoutView);
        return viewHolder;
    }

    @Override
    public void onBindViewHolder(final ViewHolder viewHolder, final int position) {
        // - get data from your itemsData at this position
        // - replace the contents of the view with that itemsData
        viewHolder.txtViewTitle.setText(itemsData[position].getTitle());
        viewHolder.imgViewIcon.setImageResource(itemsData[position].getImageSmall());
        viewHolder.setOnItemClick(new View.OnClickListener() {
            @Override
            public void onClick(View v) {
                // 宣告一組配對,底下我們讓FirstActivity裡[RecyclerView]->[ItemList]->[ImageView]和SecondActivity裡的ImageView作成一組配對
                Pair<View, String> imagePair = Pair.create((View) viewHolder.imgViewIcon, "tImage");

                Intent transitionIntent = new Intent( context, SecondActivity.class);
                transitionIntent.putExtra("imageRes", itemsData[position].getImageLarge());
                // 製作成 Material Design 需要的 ActivityOptionsCompat
                ActivityOptionsCompat options = ActivityOptionsCompat.makeSceneTransitionAnimation((Activity)context, imagePair);
                ActivityCompat.startActivity((Activity)context, transitionIntent, options.toBundle());
            }
        });
    }

    // Return the size of your itemsData (invoked by the layout manager)
    @Override
    public int getItemCount() {
        return itemsData.length;
    }

    // inner class to hold a reference to each item of RecyclerView
    public static class ViewHolder extends RecyclerView.ViewHolder {
        private View itemLayoutView;
        public TextView txtViewTitle;
        public ImageView imgViewIcon;

        public ViewHolder(View itemLayoutView) {
            super(itemLayoutView);
            this.itemLayoutView = itemLayoutView;
            txtViewTitle = (TextView) itemLayoutView.findViewById(R.id.item_title);
            imgViewIcon = (ImageView) itemLayoutView.findViewById(R.id.item_icon);
        }

        public void setOnItemClick(View.OnClickListener l){
            this.itemLayoutView.setOnClickListener(l);
        }
    }
}
從上面被標註的Code看到了在開啟頁面前,
宣告了一個全新的元件Pair(配對)
Pair<View, String> imagePair = Pair.create(from_A, to_B);
from_A 這裡請傳入頁面A的View元件實體,範例裡傳入的是viewHolder.imgViewIcon
to_B 這裡請傳入頁面B在xml裡宣告的transitionName(識別標籤),範例裡傳入的是tImage
利用Pair,
Material Design便可以知道您想要從頁面1的A元件延展至頁面2的B元件上。
然後,
我們再將Pair透過兼容性套件提供的ActivityOptionsCompat元件,
轉成Android 5.0可以接收的Bundle,
最後,
利用兼容性套件提供的方法,
開啟頁面B。
ActivityCompat.startActivity((Activity)context, transitionIntent, options.toBundle());
註︰
為什麼利用兼容性套件的方式開啟新頁面而不直接startActivity()呢?
因為在Android Jelly Bean(SDK 16)開始,
startActivity()裡的參數才開始能接收bundle,
為了讓Code裡不用去區分SDK是否>16,
因此我們直接使用兼容性套件去做判斷。
3.做岀頁面2
頁面2就只是一個很基本放上ImageView的頁面
public class SecondActivity extends Activity {
    private static final String TAG = "SecondActivity";

    private ImageView image;

    @Override
    protected void onCreate(Bundle savedInstanceState) {
        super.onCreate(savedInstanceState);

        setContentView(R.layout.activity_sescond);

        image = (ImageView) findViewById(R.id.image);
        if(getIntent()!=null){
            int res = getIntent().getIntExtra("imageRes", 0);
            if(res!=0){
                Log.i(TAG, "onCreate: "+res);
                image.setImageResource(res);
            }

        }else{
            Log.i(TAG, "onCreate:  getIntent()==null");
        }
        Log.i(TAG, "onCreate: ");
    }
activity_sescond.xml︰
<?xml version="1.0" encoding="utf-8"?>
<LinearLayout xmlns:android="http://schemas.android.com/apk/res/android"
    android:orientation="vertical" android:layout_width="match_parent"
    android:layout_height="match_parent"
    android:layout_gravity="bottom"
    android:gravity="bottom">

    <TextView
        android:layout_width="match_parent"
        android:layout_height="wrap_content"
        android:layout_marginLeft="20dp"
        android:layout_marginRight="20dp"
        android:layout_marginTop="20dp"
        android:layout_marginBottom="150dp"
        android:text="Point of Origin執行完畢\n\n可以看到ImageView從列表左方 移動放大 至下方\n\n請按[返回鍵]回上一頁"
        android:gravity="center"/>

    <ImageView
        android:id="@+id/image"
        android:layout_width="match_parent"
        android:layout_height="wrap_content"
        android:scaleType="fitCenter"
        android:src="@drawable/imageholder"
        android:transitionName="tImage"
        android:cropToPadding="false"
        android:adjustViewBounds="true" />


</LinearLayout>
從上面標註起來的地方,
我們可以看到Pair最後一個傳入的參數transitionName(識別標籤)被宣告在頁面B的ImageView裡。
差不多Coding完畢,
執行看看效果︰
 |
| Point of Origin結果展示 |
三、結論
透過簡單的傳入頁面A的元件實體和頁面B的trasitionName(識別標籤),Material Design便能幫您做岀一組Point of Origin動畫。
很簡單吧?
四、其它
有一個需要注意的地方,就是Point of Origin僅在Android 5.0以上有作用。
查了一下底層,
主要是因為從Pair轉换岀來並塞給startActivity的Bundle在Android 5.0才開始對它做岀判斷並解析成動畫特效。
如果使用者的裝置在Android 5.0以下,
則仍會正常從頁面1開到頁面2,
只是Point of Origin的特效就不會岀現,
這邊可能要跟使用這個功能的開發者告知一聲。
附上本篇教學的原始碼
上一篇
1. Material Design 的介紹與實務Sunday, December 6, 2015
讓你的view跟著CoordinatorLayout舞動
文章攢寫時間︰2015/12/06 18:37
文章更新時間︰2016/01/17 16:53
文章修改次數︰2
本篇參考來源
1. INTRODUCTION TO COORDINATOR LAYOUT ON ANDROID
了解到官方已經用很簡單的方式就讓我們做到頁面裡元件間彼此互動。
但是,
如果在前一篇的教學裡,
我們用的不是官方的Floating Action Button(以下簡稱FAB),而是第3方的。
那麼我們又該如何實作呢?
二、文章開始
首先,
我們在引用Library時,
改由Maven從repositories(雲端倉庫)下載
在您的app專案底下、build.gradle檔裡寫下該行︰
此時,
就能在專案中引用第3方套件的Floating Action Buton了。
接著,
我們將剛才的專案裡,
原本使用官方的FAB佈局改成現在第3方的︰
然後執行它。
 此時,
此時,
我們發現CoordinatorLayout完全沒有任何作用。
為什麼呢?
這是由於我們的第3方FAB套件沒有實作預設的Coordinatorlayout.Behavior。
●行為!一切都是行為!(Coordinatorlayout.Behavior)
是的。
為什麼Android會知道當Snacker往上彈起時,
FAB也需要跟著向上彈起呢?
因為官方的FAB實作了Behavior(行為)。
籍由CoordinatorLayout這個強大的Framework,
開發者們完全不用自己操刀去控制2個互相牽聯的view元件,
然後一邊算A view(被依賴者,在這篇文章範例裡指的是SnackbarLayout),
一邊再控制B view(依賴者,在這篇文章範例指的是第3方的FAB),
只要實作欲依賴的B view的Behavior,
就能輕鬆達到A、B兩個view的互動。
怎麼實作呢?
首先,我們需要創建一個新的類別,
並且繼承自CoordinatorLayout.Behavior。
為了確保我們這個實作能從xml中被inflate(擴充),
需要在這個類別裡加上含有Context與AttributeSet兩個參數的建構子︰
下一步,
Override(覆寫) layoutDependsOn()函式並且回傳true,
以確保CoordinatorLayout能幫我們明確的監聽到A view(被依賴者,SnackbarLayout)的任何畫面異動。
由於我們現在的例子中,
被依賴者是A view(範例裡的SnackbarLayout元件),
因此我們將layoutDependsOn()函式覆寫如下︰
意思是︰
倘若收到的dependency(依賴者)是SnackbarLayout,
那麼我們就告訴CoordinatorLayout說︰
對對對!我就是依賴著它SnackbarLayout。
再來,
我們要告訴CoordinatorLayout︰"倒底要怎麼個互動"的實作了。
因為剛才我們已經告訴CoordinatorLayout說︰
第3方的FAB元件現在要依賴SnackbarLayout。
因此,
每當CoordinatorLayout發現到SnackbarLayout有畫面異動時,
都會藉由一隻Callback(回呼函式)通知我們現在正在實作的FloatingActionButtonBehavior類別。
這個Callback為︰
因為onDependentViewChanged()這個函式,
我們可以取到被依賴者︰SnackbarLayout視圖當下的任何狀態
(因為...CoordinatorLayout幫你把整個SnackbarLayout視圖都傳過來了...你還會抓不到嗎@@)
我們現在想要做岀以下這個效果,
這也是前一篇教學原本就有的效果︰
每當Snackbar向上彈起時,
我們第3方FAB元件也能跟著向上彈起。
為了做到這個效果,
我們需要跟著Snackbar現在的Y值去位移第3方FAB元件的Y值,
簡單來說,
就是Snackbar現在彈多高、FAB就彈多高的意思啦!
依照官方文件的說明,
實作onDependentViewChanged()這個函式,
我們一樣要回傳true才能發揮作用。
這段Code的意思是︰每當被依賴者SnackBar一旦移動了多少Y值(高度),就將第3方FAB也跟著移動多少Y值。
這樣子我們就實作完了Behavior要的2個基本Callback(回呼函式)
layoutDependsOn()和onDependentViewChanged(),以及一個含有AttributeSet的建構子了。
剩下最後一步...
現在我們已經將Behavior實作完了,
接下來就只剩下︰
告訴CoordinatorLayout我們的第3方FAB有實作你要的Behavior,
請你幫我收下並做岀我要的效果!
因此,
我們將xml裡,第3方的FAB元件加上一行屬性
整頁xml看起來會是這個樣子
差不多就是這個樣子了,
為了證明這整篇教學沒有在唬爛,
底下這是執行後的畫面︰
 如果您想要使用預設的Behavior,
只需要在您的Behavior類別上,
加上DefaultBehavior這個Anntation即可。
藉由實作CoordinatorLayout.Behavior,
我們讓 第3方FAB元件 與 SnackBar 達到了 互 動 效果。
那...如果今天有一個專案需求是︰
當列表滾動時,
上方的工具列要隱藏,
又要怎麼做?
誰是依賴者?誰又是被依賴者?
待續...XD
文章更新時間︰2016/01/17 16:53
文章修改次數︰2
本篇參考來源
1. INTRODUCTION TO COORDINATOR LAYOUT ON ANDROID
一、前言
藉由前一篇的教學,了解到官方已經用很簡單的方式就讓我們做到頁面裡元件間彼此互動。
但是,
如果在前一篇的教學裡,
我們用的不是官方的Floating Action Button(以下簡稱FAB),而是第3方的。
那麼我們又該如何實作呢?
二、文章開始
首先,
我們在引用Library時,
改由Maven從repositories(雲端倉庫)下載
在您的app專案底下、build.gradle檔裡寫下該行︰
compile 'com.getbase:floatingactionbutton:1.9.1'
此時,
就能在專案中引用第3方套件的Floating Action Buton了。
接著,
我們將剛才的專案裡,
原本使用官方的FAB佈局改成現在第3方的︰
<!--?xml version="1.0" encoding="utf-8"?-->
<android.support.design.widget.CoordinatorLayout
    xmlns:android="http://schemas.android.com/apk/res/android"
    android:layout_width="match_parent"
    android:layout_height="match_parent">

    <com.getbase.floatingactionbutton.FloatingActionButton
        android:id="@+id/fab"
        android:layout_width="wrap_content"
        android:layout_height="wrap_content"
        android:layout_gravity="end|bottom"
        android:layout_margin="16dp"
        android:src="@drawable/ic_done">

    <com.getbase.floatingactionbutton.FloatingActionButton>
</android.support.design.widget.CoordinatorLayout>
然後執行它。

我們發現CoordinatorLayout完全沒有任何作用。
為什麼呢?
這是由於我們的第3方FAB套件沒有實作預設的Coordinatorlayout.Behavior。
●行為!一切都是行為!(Coordinatorlayout.Behavior)
是的。
為什麼Android會知道當Snacker往上彈起時,
FAB也需要跟著向上彈起呢?
因為官方的FAB實作了Behavior(行為)。
籍由CoordinatorLayout這個強大的Framework,
開發者們完全不用自己操刀去控制2個互相牽聯的view元件,
然後一邊算A view(被依賴者,在這篇文章範例裡指的是SnackbarLayout),
一邊再控制B view(依賴者,在這篇文章範例指的是第3方的FAB),
只要實作欲依賴的B view的Behavior,
就能輕鬆達到A、B兩個view的互動。
怎麼實作呢?
首先,我們需要創建一個新的類別,
並且繼承自CoordinatorLayout.Behavior。
public class FloatingActionButtonBehavior extends CoordinatorLayout.Behavior<FloatingActionButton>
為了確保我們這個實作能從xml中被inflate(擴充),
需要在這個類別裡加上含有Context與AttributeSet兩個參數的建構子︰
public FloatingActionButtonBehavior(Context context, AttributeSet attrs) {}
下一步,
Override(覆寫) layoutDependsOn()函式並且回傳true,
以確保CoordinatorLayout能幫我們明確的監聽到A view(被依賴者,SnackbarLayout)的任何畫面異動。
由於我們現在的例子中,
被依賴者是A view(範例裡的SnackbarLayout元件),
因此我們將layoutDependsOn()函式覆寫如下︰
@Override
public boolean layoutDependsOn(CoordinatorLayout parent, FloatingActionButton child, View dependency) {
  return dependency instanceof SnackbarLayout;
}
意思是︰
倘若收到的dependency(依賴者)是SnackbarLayout,
那麼我們就告訴CoordinatorLayout說︰
對對對!我就是依賴著它SnackbarLayout。
再來,
我們要告訴CoordinatorLayout︰"倒底要怎麼個互動"的實作了。
因為剛才我們已經告訴CoordinatorLayout說︰
第3方的FAB元件現在要依賴SnackbarLayout。
因此,
每當CoordinatorLayout發現到SnackbarLayout有畫面異動時,
都會藉由一隻Callback(回呼函式)通知我們現在正在實作的FloatingActionButtonBehavior類別。
這個Callback為︰
onDependentViewChanged()
因為onDependentViewChanged()這個函式,
我們可以取到被依賴者︰SnackbarLayout視圖當下的任何狀態
(因為...CoordinatorLayout幫你把整個SnackbarLayout視圖都傳過來了...你還會抓不到嗎@@)
我們現在想要做岀以下這個效果,
這也是前一篇教學原本就有的效果︰
每當Snackbar向上彈起時,
我們第3方FAB元件也能跟著向上彈起。
為了做到這個效果,
我們需要跟著Snackbar現在的Y值去位移第3方FAB元件的Y值,
簡單來說,
就是Snackbar現在彈多高、FAB就彈多高的意思啦!
依照官方文件的說明,
實作onDependentViewChanged()這個函式,
我們一樣要回傳true才能發揮作用。
@Override
public boolean onDependentViewChanged(CoordinatorLayout parent, FloatingActionButton child, View dependency) {
  float translationY = Math.min(0, dependency.getTranslationY() - dependency.getHeight());
  child.setTranslationY(translationY);
  return true;
}
這段Code的意思是︰每當被依賴者SnackBar一旦移動了多少Y值(高度),就將第3方FAB也跟著移動多少Y值。
這樣子我們就實作完了Behavior要的2個基本Callback(回呼函式)
layoutDependsOn()和onDependentViewChanged(),以及一個含有AttributeSet的建構子了。
剩下最後一步...
現在我們已經將Behavior實作完了,
接下來就只剩下︰
告訴CoordinatorLayout我們的第3方FAB有實作你要的Behavior,
請你幫我收下並做岀我要的效果!
因此,
我們將xml裡,第3方的FAB元件加上一行屬性
app:layout_behavior="com.simon.hellocoordinatorlayout.FloatingActionButtonBehavior"
整頁xml看起來會是這個樣子
<!--?xml version="1.0" encoding="utf-8"?-->
<android.support.design.widget.CoordinatorLayout
    xmlns:android="http://schemas.android.com/apk/res/android"
    xmlns:app="http://schemas.android.com/apk/res-auto"
    android:layout_width="match_parent"
    android:layout_height="match_parent">

    <TextView
        android:layout_width="wrap_content"
        android:layout_height="wrap_content"
        android:text="右下角是第3方套件的FAB按鈕,該專案同時實作了CoordinatorLayout.Behivor"/>

    <com.getbase.floatingactionbutton.FloatingActionButton
        android:id="@+id/fab"
        android:layout_width="wrap_content"
        android:layout_height="wrap_content"
        android:layout_gravity="end|bottom"
        android:layout_margin="16dp"
        app:fab_icon="@drawable/ic_done"
        app:layout_behavior="com.simon.hellocoordinatorlayout.FloatingActionButtonBehavior"/>

</android.support.design.widget.CoordinatorLayout>
差不多就是這個樣子了,
為了證明這整篇教學沒有在唬爛,
底下這是執行後的畫面︰

只需要在您的Behavior類別上,
加上DefaultBehavior這個Anntation即可。
三、總結
藉由實作CoordinatorLayout.Behavior,我們讓 第3方FAB元件 與 SnackBar 達到了 互 動 效果。
那...如果今天有一個專案需求是︰
當列表滾動時,
上方的工具列要隱藏,
又要怎麼做?
誰是依賴者?誰又是被依賴者?
待續...XD
四、其它
附上本篇教學的原始碼Wednesday, September 16, 2015
CoordinatorLayout初步認識
文章攢寫時間︰2015/09/16 18:37
文章更新時間︰2016/01/17 16:53
文章更新次數︰4
Google介紹了有關於Android Design Support Library,
該套件讓開發者們能更方便的使用Material Design(實感設計,或譯材料設計),
而且也能在API level 7(Android 2.1)或以上的Android版本兼容。
相關資訊可以參考Android Developers Blog。
其中最有趣的是官方宣稱一個"超強大"的FrameLayout,
名為CoordinatorLayout。
就如同這個名字所言,
這個強大的Layout擁有"依據Layout底下一個View的位置變化,
進而讓其它子View也跟著位移"的能力。
使用這個CoordinatorLayout的方式只有一個,
就是將子View放進CoordinatorLayout的子階層(就像您使用FrameLayout那樣,將TextView放進FrameLayout裡)。
接下來要展示的這個範例相當簡單,
一個Floating Action Buton觸發Snackbar展開連動關係。
首先我們要做的是 - 將Support Design Library放入Gradle中︰
再來,
替activity建立一個簡單的Layout︰
接著,
攢寫activity。
做完的結果如下︰

由上圖可看到︰
當Snackbar(下方突然岀現的黑色bar)岀現時,
Floating Action Buton(綠色勾勾)就會跟著往上移動。
很酷,對吧?
註︰官方總是喜歡用簡單幾行code(就像Hello World一樣)吸引開發者們嚐鮮,然後⋯你懂的。
但如果今天你有客製化的元件想要也跟著位移,
又該怎麼實作?
跟著位移的原理又是什麼?
請各位看倌們接著看下一篇教學︰
讓你的view跟著CoordinatorLayout舞動
如需本篇教學原始碼,
請至Github下載。
2. CoordinatorLayout与滚动的处理
3. Android NestedScrolling 实战
4. Android Developers Blog
文章更新時間︰2016/01/17 16:53
文章更新次數︰4
本篇參考來源
1. INTRODUCTION TO COORDINATOR LAYOUT ON ANDROID一、前言
在2015年的Google I/O大會上,Google介紹了有關於Android Design Support Library,
該套件讓開發者們能更方便的使用Material Design(實感設計,或譯材料設計),
而且也能在API level 7(Android 2.1)或以上的Android版本兼容。
相關資訊可以參考Android Developers Blog。
二、文章開始
Android Design Support Library有很多好用的Material Design元件,其中最有趣的是官方宣稱一個"超強大"的FrameLayout,
名為CoordinatorLayout。
就如同這個名字所言,
這個強大的Layout擁有"依據Layout底下一個View的位置變化,
進而讓其它子View也跟著位移"的能力。
使用這個CoordinatorLayout的方式只有一個,
就是將子View放進CoordinatorLayout的子階層(就像您使用FrameLayout那樣,將TextView放進FrameLayout裡)。
接下來要展示的這個範例相當簡單,
一個Floating Action Buton觸發Snackbar展開連動關係。
首先我們要做的是 - 將Support Design Library放入Gradle中︰
compile 'com.android.support:design:22.2.0'
再來,
替activity建立一個簡單的Layout︰
<!--?xml version="1.0" encoding="utf-8"?-->
<android.support.design.widget.CoordinatorLayout
    xmlns:android="http://schemas.android.com/apk/res/android"
    android:layout_width="match_parent"
    android:layout_height="match_parent">

    <android.support.design.widget.FloatingActionButton
        android:id="@+id/fab"
        android:layout_width="wrap_content"
        android:layout_height="wrap_content"
        android:layout_gravity="end|bottom"
        android:layout_margin="16dp"
        android:src="@drawable/ic_done">

    </android.support.design.widget.FloatingActionButton>
</android.support.design.widget.CoordinatorLayout>
接著,
攢寫activity。
public class MainActivity extends AppCompatActivity {

  @Override
  protected void onCreate(Bundle savedInstanceState) {
    super.onCreate(savedInstanceState);
    setContentView(R.layout.activity_main);
    findViewById(R.id.fab).setOnClickListener(new View.OnClickListener() {
      @Override
      public void onClick(View view) {
        Snackbar.make(view, "Hello Snackbar", Snackbar.LENGTH_LONG).show();
      }
    });
  }
}
做完的結果如下︰

由上圖可看到︰
當Snackbar(下方突然岀現的黑色bar)岀現時,
Floating Action Buton(綠色勾勾)就會跟著往上移動。
很酷,對吧?
註︰官方總是喜歡用簡單幾行code(就像Hello World一樣)吸引開發者們嚐鮮,然後⋯你懂的。
但如果今天你有客製化的元件想要也跟著位移,
又該怎麼實作?
跟著位移的原理又是什麼?
請各位看倌們接著看下一篇教學︰
讓你的view跟著CoordinatorLayout舞動
如需本篇教學原始碼,
請至Github下載。
相關文章
1. Android 嵌套滑动机制(NestedScrolling)2. CoordinatorLayout与滚动的处理
3. Android NestedScrolling 实战
4. Android Developers Blog
Wednesday, June 10, 2015
使用Google OAuth2登入並使用雲端試算表
文章攢寫時間︰2015/06/11 13:37
Google不再提供Client-Login和OAuth的方式提供開發者登入Google帳戶,
如需使用程式登入,
僅能由OAuth2的管道。

在Android裝置上要登入Google使用其服務,
Play Service已提供一個極簡易的方法︰
這種登入的方式雖然很簡便,
但是缺點就是「只能存取自己帳戶底下」的雲端硬碟或個人內容。
如果今天想要把SpreadSheet(試算表)當作雲端資料庫,
讓你的App能隨時來存取資料,
這個方法可能就行不通了。
今天則是介紹使用OAuth2的方式。
Google提供了相~當~多~的管道過OAuth2,
這裡僅示例Android我實際用過且work的方式 - 使用P12檔。

此時跳出一個畫面,
把p12檔存起來。
這即將是您登入Google使用的鑰匙。

畫面也同時看到多了一個新的登入連線方式了。

建立一個全新的assets資料夾
(此步驟如果已有assets資料夾則無需理會)
將剛才存起來的P12檔存入。

但因為Google也提供了google-oauth-java-client套件供我們走OAuth2登入,
省掉開發的時程。
這個專案需要以下的jar檔,
請下載並import。
告知Google我們要存取什麼範圍(SCOPE)的content,
就可由底下的程式範例做登入動作了。
getTempPkc12File()函式內容如下,
記得更改掉open()裡的P12檔檔名。
如果要使用SpreadSheet API,
這裡提供整份程式碼示例
如果是Server則又有各自不同的登入方式,
就交給大家去研究了。
2. 官方OAuth2InstalledApp
3. 官方OAuth2介紹
4. 使用試算表API
取得user-code
curl -d "client_id=855763605695-nn0a0tv8k83pqq28trtfckfhf8och19t.apps.googleusercontent.com&scope=https://spreadsheets.google.com/feeds" https://accounts.google.com/o/oauth2/device/code
RESPONSE:
{
"device_code" : "LDBE-ZXPU4/wyoUadofXRCeslItAym9DJvQAt8fS8mFvlGUk9a5Ix4",
"user_code" : "LDBE-ZXPU",
"verification_url" : "https://www.google.com/device",
"expires_in" : 1800,
"interval" : 5
}
==============================
取得accessToken
curl -d "client_id=855763605695-nn0a0tv8k83pqq28trtfckfhf8och19t.apps.googleusercontent.com&client_secret=yz2SJO7DrYSxEwEYGA6xcjIl&code=LDBE-ZXPU4/wyoUadofXRCeslItAym9DJvQAt8fS8mFvlGUk9a5Ix4&grant_type=http://oauth.net/grant_type/device/1.0" https://www.googleapis.com/oauth2/v3/token
https://accounts.google.com/o/oauth2/auth?
scope=email%20profile&
redirect_uri=urn:ietf:wg:oauth:2.0:oob&
response_type=code&
client_id=855763605695-nn0a0tv8k83pqq28trtfckfhf8och19t.apps.googleusercontent.com
一、前言
自從2015年05月開始,Google不再提供Client-Login和OAuth的方式提供開發者登入Google帳戶,
如需使用程式登入,
僅能由OAuth2的管道。

在Android裝置上要登入Google使用其服務,
Play Service已提供一個極簡易的方法︰
GoogleAuthUtil.getToken(mActivity, mEmail, mScope);
這種登入的方式雖然很簡便,
但是缺點就是「只能存取自己帳戶底下」的雲端硬碟或個人內容。
如果今天想要把SpreadSheet(試算表)當作雲端資料庫,
讓你的App能隨時來存取資料,
這個方法可能就行不通了。
二、文章開始
前一篇曾使用過Client-Login登入Google的方式來存取SpreadSheet(試算表),今天則是介紹使用OAuth2的方式。
Google提供了相~當~多~的管道過OAuth2,
這裡僅示例Android我實際用過且work的方式 - 使用P12檔。
步驟1 在Google APIs Console建立一個新專案並做相關設定

 |
| 同意畫面是顯示給使用者認證的畫面, 商品名稱一定要打上去, 並記得按下方的儲存鈕。 |
 |
| 建立新的用戶端ID |
 |
| 選擇使用P12檔的登入方式 |
把p12檔存起來。
這即將是您登入Google使用的鑰匙。

畫面也同時看到多了一個新的登入連線方式了。

步驟2 將P12檔複製到Android Studio專案底下
在src/main底下點滑鼠右鍵,建立一個全新的assets資料夾
(此步驟如果已有assets資料夾則無需理會)
將剛才存起來的P12檔存入。

步驟3 匯入需要的jar檔
OAuth2的登入流程相當繁鎖,但因為Google也提供了google-oauth-java-client套件供我們走OAuth2登入,
省掉開發的時程。
這個專案需要以下的jar檔,
請下載並import。
gdata-core-1.0.jar //spreadsheet會用到
gdata-spreadsheet-3.0.jar //spreadsheet用到
google-http-client-1.18.0-rc.jar //spreadsheet用到
google-http-client-jackson-1.18.00rc.jar //spreadsheet用到
guava-11.0.2.jar //spreadsheet用到
jackson-core-asl-1.9.11.jar //spreadsheet用到

google-api-client-1.18.0-rc.jar //OAuth2會用到
google-oauth-client-1.18.0-rc.jar //OAuth2會用到
步驟4 開始攢寫程式
走OAuth2時,告知Google我們要存取什麼範圍(SCOPE)的content,
就可由底下的程式範例做登入動作了。
HttpTransport httpTransport = new NetHttpTransport();
                JacksonFactory jsonFactory = new JacksonFactory();

                ArrayList SCOPES = new ArrayList();
                SCOPES.add("https://spreadsheets.google.com/feeds");

                //SerServiceAcountId: clientID value should be similar to @developer.gserviceaccount.com They basically expect the email_address value from the console api credentials
                GoogleCredential credential = new GoogleCredential.Builder().setTransport(httpTransport).setJsonFactory(jsonFactory)
                        .setServiceAccountId("填入剛才新增用戶端ID得到的Mail")
                        .setServiceAccountPrivateKeyFromP12File(getTempPkc12File())
                        .setServiceAccountUser("欲分享SpreadSheet的人的gmail")
                        .setServiceAccountScopes(SCOPES)
                        .build();

                credential.refreshToken();

                String accessToken = credential.getAccessToken();
                Log.i(TAG, "accessToken: "+accessToken);
getTempPkc12File()函式內容如下,
記得更改掉open()裡的P12檔檔名。
        private File getTempPkc12File() throws IOException {
            InputStream pkc12Stream = mContext.getAssets().open("ScalpTest-1a66d0dc35fe.p12");//記得將檔名改成剛才存進Assets資料夾裡的P12檔檔名
            File tempPkc12File = File.createTempFile("P12File", "p12");
            OutputStream tempFileStream = new FileOutputStream(tempPkc12File);

            int read = 0;
            byte[] bytes = new byte[1024];
            while ((read = pkc12Stream.read(bytes)) != -1) {
                tempFileStream.write(bytes, 0, read);
            }
            return tempPkc12File;
        }
如果要使用SpreadSheet API,
這裡提供整份程式碼示例
List<spreadsheetentry> spreadsheets = null;

            SpreadsheetService mSpreadSheetService = new SpreadsheetService("欲存取的資料表名稱");
            mSpreadSheetService.setProtocolVersion(SpreadsheetService.Versions.V3);
            try {
                //2015/05月已停止使用
//                mSpreadSheetService.setUserCredentials("xxx@gmail.com", "密碼");

                HttpTransport httpTransport = new NetHttpTransport();
                JacksonFactory jsonFactory = new JacksonFactory();

                ArrayList SCOPES = new ArrayList();
                SCOPES.add("https://spreadsheets.google.com/feeds");

                //SerServiceAcountId: clientID value should be similar to @developer.gserviceaccount.com They basically expect the email_address value from the console api credentials
                GoogleCredential credential = new GoogleCredential.Builder().setTransport(httpTransport).setJsonFactory(jsonFactory)
                        .setServiceAccountId("填入剛才新增用戶端ID得到的Mail")
                        .setServiceAccountPrivateKeyFromP12File(getTempPkc12File())
                        .setServiceAccountUser("xxx@gmail.com")
                        .setServiceAccountScopes(SCOPES)
                        .build();

                credential.refreshToken();

                String accessToken = credential.getAccessToken();
                Log.i(TAG, "accessToken: "+accessToken);

                mSpreadSheetService.setOAuth2Credentials(credential);

                URL url = new URL("https://spreadsheets.google.com/feeds/spreadsheets/private/full");

                SpreadsheetFeed spreadFeed = mSpreadSheetService.getFeed(url, SpreadsheetFeed.class);
                spreadsheets = spreadFeed.getEntries();
三、結論
以上介紹了使用P12檔過Google OAuth2的方式。如果是Server則又有各自不同的登入方式,
就交給大家去研究了。
相關文章
1. 官方OAuth2ForDevices2. 官方OAuth2InstalledApp
3. 官方OAuth2介紹
4. 使用試算表API
取得user-code
curl -d "client_id=855763605695-nn0a0tv8k83pqq28trtfckfhf8och19t.apps.googleusercontent.com&scope=https://spreadsheets.google.com/feeds" https://accounts.google.com/o/oauth2/device/code
RESPONSE:
{
"device_code" : "LDBE-ZXPU4/wyoUadofXRCeslItAym9DJvQAt8fS8mFvlGUk9a5Ix4",
"user_code" : "LDBE-ZXPU",
"verification_url" : "https://www.google.com/device",
"expires_in" : 1800,
"interval" : 5
}
==============================
取得accessToken
curl -d "client_id=855763605695-nn0a0tv8k83pqq28trtfckfhf8och19t.apps.googleusercontent.com&client_secret=yz2SJO7DrYSxEwEYGA6xcjIl&code=LDBE-ZXPU4/wyoUadofXRCeslItAym9DJvQAt8fS8mFvlGUk9a5Ix4&grant_type=http://oauth.net/grant_type/device/1.0" https://www.googleapis.com/oauth2/v3/token
https://accounts.google.com/o/oauth2/auth?
scope=email%20profile&
redirect_uri=urn:ietf:wg:oauth:2.0:oob&
response_type=code&
client_id=855763605695-nn0a0tv8k83pqq28trtfckfhf8och19t.apps.googleusercontent.com
Tuesday, June 2, 2015
[智能家居]用Arduino官方WiFi Shield的控制LED開關(使用Mac環境)
文章攢寫時間︰2015/06/02 14:03
我們也因此進入一個天馬行空的世界。
能利用這塊板子做些什麼事呢?
嗯⋯就從微智能家居「控制LED的開關」開始吧~
我有針對Webduino Library稍做修改以支援WiFi Shield。
請至GitHub下載並放在
你的Arduino目錄\libraries底下

不熟悉Git的人,
可以到此下載zip壓縮包。
開啟一個全新的Arduino專案,
將下方程式碼全數貼上。
請在Arduino IDE工具列中使用[草稿碼]→[include Library]來引用。
※剛才下載到libraries目錄底下的Webduino岀現在Contributed libraries裡了(見下圖)

就可以驗證並上傳程式至Arduino UNO裡了。
啟動序列埠監控視窗(Shift + Command + M),
等待連線的ip位址陸出。

推薦使用CocoaRestClient這套軟體去發岀POST請求。

接著就可以等著看結果囉!
三、注意事項
Arduino官方有提到WiFi Shield的以下數位PIN腳已被使用,
串接LED燈時請不要再使用這些腳位了。
數位PIN腳4 被用來當作SD卡的Slave Select(控制訊號)了。
數位PIN腳7 被用來當作WiFi Shield和Arduino之間的握手協定(handshake)了。
數位PIN腳10 被用來當作WiFi的Slave Select(控制訊號)了。
數位PIN腳11, 12, 13被用來當作Arduino溝通的序列埠了。
所以我們只能用數位PIN腳 3, 5, 6, 8, 9來控制LED燈。

當然我們也就可以用GET來丟參數。
但因為Webduino這套第3方函式庫對於POST有較佳的程式支援,
理所當然就使用POST來傳輸以控制LED燈的開關嚕!
在成功使用WiFi控制LED燈後,
接下來聰明的你還想玩些什麼呢?(笑)
2. 更新WiFi Shield firmware
一、前言
繼前一篇更新完WiFi Shield的韌體(firmware v1.1.0)後,我們也因此進入一個天馬行空的世界。
能利用這塊板子做些什麼事呢?
嗯⋯就從微智能家居「控制LED的開關」開始吧~
二、文章開始
步驟1 準備需要的環境
這個專案需要使用到以下的玩具- 可連線上網的無線路由器AP
- Arduino UNO
- WiFi Shield
- 330Ω電阻(橙橙棕) x1
- LED燈泡 x1
- 跳線 x2
 |
| 麵包板示意圖 |
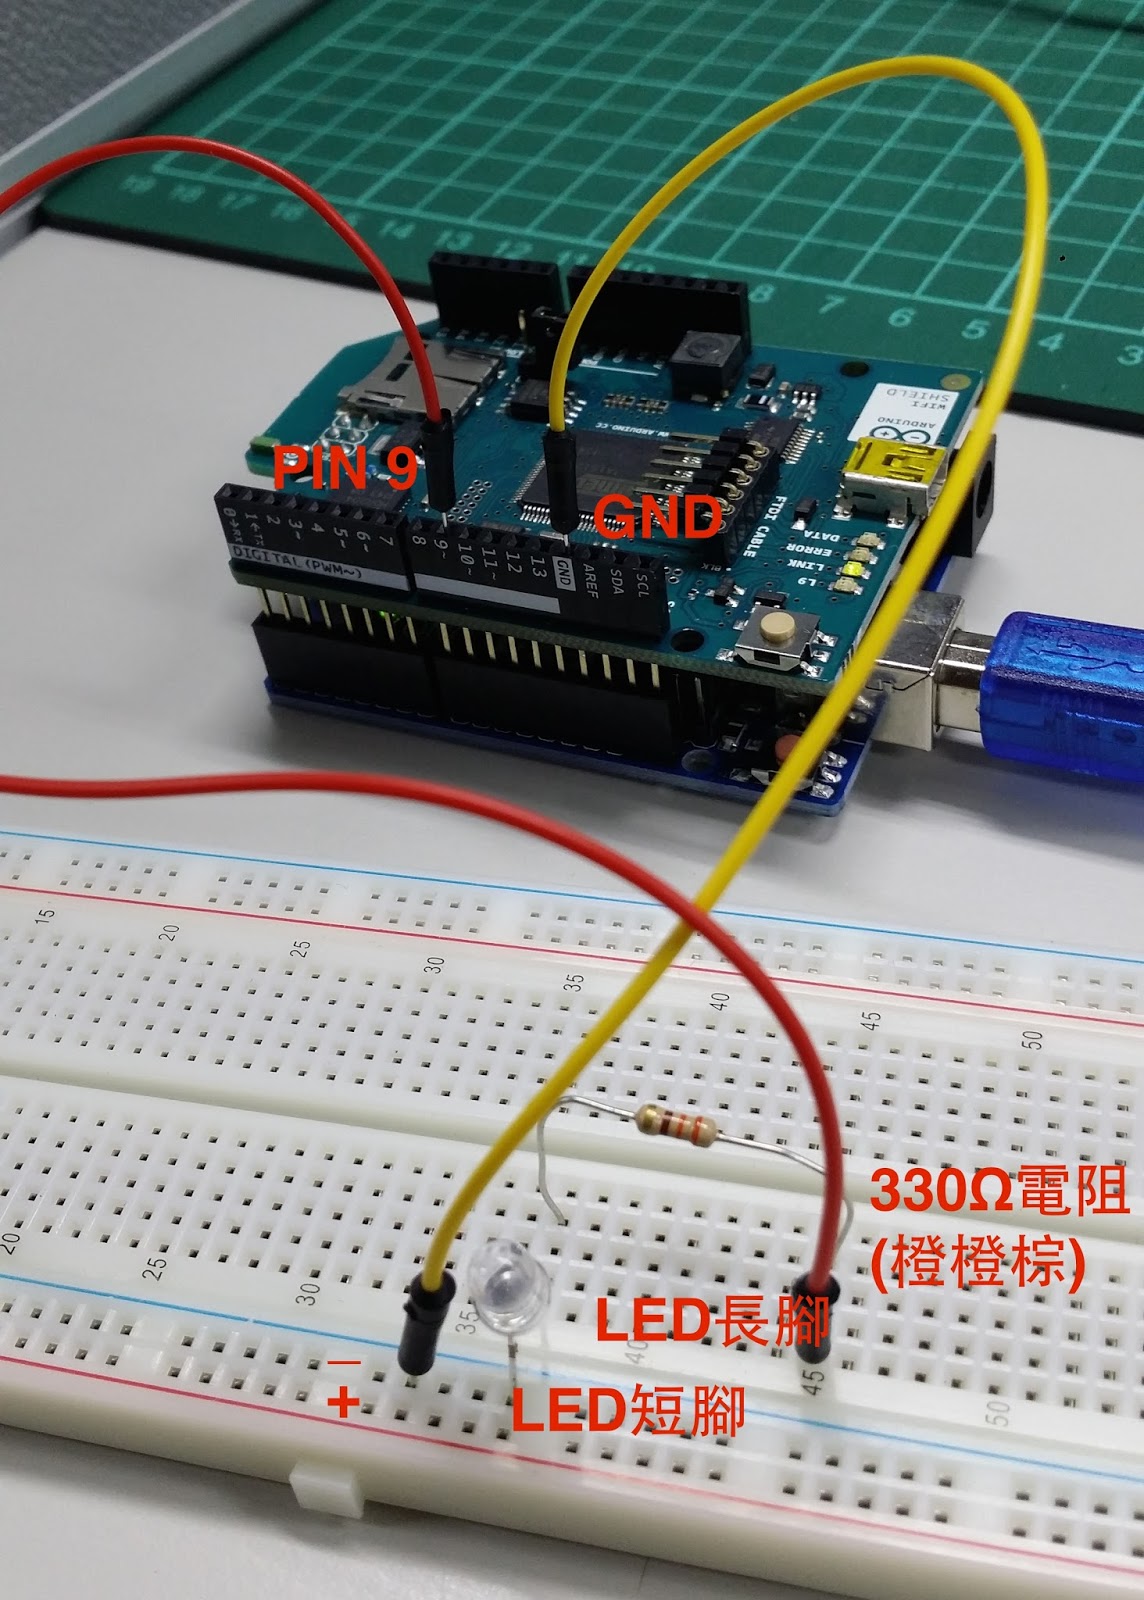 |
| 實際連接的樣子 |
步驟2 下載需要的函式庫Webduino
這個專案需要使用到支援WiFi Shield的Webduino函式庫,我有針對Webduino Library稍做修改以支援WiFi Shield。
請至GitHub下載並放在
你的Arduino目錄\libraries底下

不熟悉Git的人,
可以到此下載zip壓縮包。
步驟3 複製程式碼並引用需要的函式庫
開啟一個全新的Arduino專案,
將下方程式碼全數貼上。
char ssid[] = "換成你的WiFi無線網路名稱";
char pass[] = "換成你的WiFi無線網路密碼";

int status = WL_IDLE_STATUS;
WebServer webserver("", 80);

P(homePage) =
  "<!doctype html>"
  "<html>Arduino微網站</title>"
  "</head><body>"
  "這是微網站首頁。"
  "</body></html>";

P(lightPage) =
  "<!doctype html>"
  "<html>Arduino微網站</title>"
  "</head><body>"
  "這是燈泡控制專頁。"
  "</body></html>";

P(Get_head) = "<h1>收到了GET</h1>";
P(Post_head) = "<h1>收到了POST</h1>";
P(Unknown_head) = "<h1>UNKNOWN request</h1>";

const byte LED_PIN = 9;//LED燈泡插在PIN腳9

/**預設的指令是印岀homePage的文案*/
void defaultCmd(WebServer &server, WebServer::ConnectionType type, char *url_tail, bool tail_complete)
{
  server.httpSuccess();
  Serial.println("httpSuccess");
  if (type != WebServer::HEAD)
  {
    server.printP(homePage);
  }
}

/**當收到燈泡控制的指令時*/
void lightCmd(WebServer &server, WebServer::ConnectionType type, char *url_tail, bool tail_complete)
{
  server.httpSuccess();
  Serial.println("httpSuccess");
  if (type != WebServer::HEAD)
  {
    //檢查是傳來的是GET或是POST
    switch (type)
    {
      case WebServer::GET:
        server.printP(Get_head);
        server.println(" ");
        break;
      case WebServer::POST:
        server.printP(Post_head);
        server.println(" ");
        parsePost(server);
        break;
      default:
        server.printP(Unknown_head);
    }
    server.printP(lightPage);
  }
}

/**解析傳來的POST指令*/
void parsePost(WebServer &server) {
  Serial.println("parsePost");

  char key[16];
  char value[16];
  while (server.readPOSTparam(key, 16, value, 16)) {

    //比對字元使用的是strcmp,當回傳值為0時代表字元符合
    if (strcmp(key, "light") == 0) {
      server.print("燈光已經");
      if (strcmp(value, "on") == 0) {
        digitalWrite(LED_PIN, HIGH);
        server.print("打開。");
      } else {
        digitalWrite(LED_PIN, LOW);
        server.print("關閉。");
      }
    }
  }
}

void setup() {
  pinMode(LED_PIN, OUTPUT);//初始化LED燈

  Serial.begin(9600);//初始化序列埠至9600

  while (!Serial) {
    ; // wait for serial port to connect. Needed for Leonardo only
  }

  // check for the presence of the shield:
  if (WiFi.status() == WL_NO_SHIELD) {
    Serial.println("WiFi shield not present");
    // don't continue:
    while (true);
  }

  // attempt to connect to Wifi network:
  while ( status != WL_CONNECTED) {
    Serial.print("Attempting to connect to SSID: ");
    Serial.println(ssid);
    // Connect to WPA/WPA2 network. Change this line if using open or WEP network:
    status = WiFi.begin(ssid, pass);

    // wait 5 seconds for connection:
    delay(5000);
  }

  // 設定當外部連線連入Arduino時,相對應的處理函式
  webserver.setDefaultCommand(&defaultCmd);   // 處理「首頁」的請求
  webserver.addCommand("light.html", &lightCmd);  // 處理「燈泡控制頁」的請求
  webserver.begin();

  // you're connected now, so print out the status:
  printWifiStatus();
}

void loop() {
  webserver.processConnection();
}

/**印岀連線的WiFi狀態*/
void printWifiStatus() {
  // print the SSID of the network you're attached to:
  Serial.print("SSID: ");
  Serial.println(WiFi.SSID());

  // print your WiFi shield's IP address:
  IPAddress ip = WiFi.localIP();
  Serial.print("IP Address: ");
  Serial.println(ip);

  // print the received signal strength:
  long rssi = WiFi.RSSI();
  Serial.print("signal strength (RSSI):");
  Serial.print(rssi);
  Serial.println(" dBm");
}
步驟4 引用函式庫
這個專案需要用到WiFi、SPI和上面所述的Webduino共三個函式庫,請在Arduino IDE工具列中使用[草稿碼]→[include Library]來引用。
※剛才下載到libraries目錄底下的Webduino岀現在Contributed libraries裡了(見下圖)

步驟5 編譯並啟動
引用完所需要的函式庫以後,就可以驗證並上傳程式至Arduino UNO裡了。
啟動序列埠監控視窗(Shift + Command + M),
等待連線的ip位址陸出。

步驟6 使用CocoaRestClient對WiFi Shield發岀POST連線
因為範例裡是使用POST的方式去發岀key為light和value為on/off的參數去控制LED燈,推薦使用CocoaRestClient這套軟體去發岀POST請求。

接著就可以等著看結果囉!
三、注意事項
Arduino官方有提到WiFi Shield的以下數位PIN腳已被使用,
串接LED燈時請不要再使用這些腳位了。
數位PIN腳4 被用來當作SD卡的Slave Select(控制訊號)了。
數位PIN腳7 被用來當作WiFi Shield和Arduino之間的握手協定(handshake)了。
數位PIN腳10 被用來當作WiFi的Slave Select(控制訊號)了。
數位PIN腳11, 12, 13被用來當作Arduino溝通的序列埠了。
所以我們只能用數位PIN腳 3, 5, 6, 8, 9來控制LED燈。

四、結論
我們透過HTTP的POST方式將參數丟給Arduino WiFi Shield,當然我們也就可以用GET來丟參數。
但因為Webduino這套第3方函式庫對於POST有較佳的程式支援,
理所當然就使用POST來傳輸以控制LED燈的開關嚕!
在成功使用WiFi控制LED燈後,
接下來聰明的你還想玩些什麼呢?(笑)
相關連結
1. Arduino官方網站2. 更新WiFi Shield firmware
Friday, May 29, 2015
更新Arduino官方WiFi Shield的firmware(使用Mac環境)
文章攢寫時間︰2015/05/29 15:13
文章更新時間︰2015/05/31 18:04
文章更新次數︰2
原以為好日子就此開始,
疏不知用板子對外發岀request時,
居然一直回應我connected failed.
查了一下才知道因為原廠的firmware過舊(v.1.0.0),
解決辦法有︰
1.不更新韌體,繼續研用舊版v1.0.0搭配Arduino IDE 1.0.2對外連線(請參考Ken Yang部落格)
2.更新WiFi Shield的韌體讓最新版Arduino IDE 1.6.4能順利對外連線
查看韌體版本可透過以下語法
Serial.begin(9600);
Serial.println(WiFi.firmwareVersion());
記得include SPI.h 和 WiFi.h 兩個類別!
這裡我就來實作更新韌體的部份!
二、文章開始
依照官方的教學的說明,
在更新韌體進板子前,
請務必將WiFi Shield從Arduino板子上拔除!
其由開放原始碼社群負責主導與開發,
透過這個工具可以簡化安裝軟體的編譯工作,
並且可以自動處理套件相依性問題,
概念上很類似 Linux 的 apt 與 yum,
只要下達一些簡單的指令就可以輕鬆安裝各種軟體。
(以上解釋來至CTW論壇)
到MacPorts官網依照你的Mac OS版本下載相對應的安裝檔案。

因此,
我們透過MacPorts將DFU Programmer軟體下載下來。
語法是
下載下來後,請確保是最新版本。
語法如下
※請確認安裝完的DFU Programmer版本在v0.5.4(含)或之後。
或者,也會直接放在最新版的Arduino application裡。
1.使用Finder開啟應用程式資料夾
2.對Arduino.app點擊滑鼠右鍵選擇「顯示套件內容」

3.我的wifishield韌體資料夾路徑是在
/Applications/Arduino/Arduino164.app/Contents/Java/hardware/arduino/avr/firmwares/wifishield/
語法的存放路徑在剛才目錄中的底下目錄scripts裡
分別可看到有2個檔案
ArduinoWifiShield_upgrade_mac.sh(Mac專用)
或
ArduinoWifiShield_upgrade.sh(Linux專用)
因為腳本檔是用DFU-Programmer寫起來的,
因此只要剛才DFU-Programmer在v0.5.4以後,
就可以開始接下來的步驟!
為了讓WiFi Shield進入programming mode,
需使用Jumper將J3連結點串聯起來。

將已拔除Arduino板的WiFi Shield插入電腦USB,另一端插在板子的Mini USB孔上。
接著在終端機裡執行剛才的腳本檔
我下的語法如下
順利的話,就能看到韌體更新成功視窗了。

最後記得將Jumper拔掉並按下板子上的RESET鍵,
整個韌體更新的動作就完成囉!
查看一下,
WiFi firmware的版本已更新至最新v1.1.0無誤。

使用client.connect(server, 80)對Google發岀一次頁面request,
也不會再遇到connect failed了!

三、其它
如果有使用Webduino Library,
與Arduino IDE 1.6.4匹配的Webduino版本是1.7。
接下來做些什麼呢?
嗯⋯跟我一起玩微智能家居吧!
2. Arduino官方
3. 國外一篇更新韌體的部落格教學
文章更新時間︰2015/05/31 18:04
文章更新次數︰2
一、前言
花了3千塊買了一塊官方的WiFi Shield板子,原以為好日子就此開始,
疏不知用板子對外發岀request時,
居然一直回應我connected failed.
查了一下才知道因為原廠的firmware過舊(v.1.0.0),
解決辦法有︰
1.不更新韌體,繼續研用舊版v1.0.0搭配Arduino IDE 1.0.2對外連線(請參考Ken Yang部落格)
2.更新WiFi Shield的韌體讓最新版Arduino IDE 1.6.4能順利對外連線
查看韌體版本可透過以下語法
Serial.begin(9600);
Serial.println(WiFi.firmwareVersion());
記得include SPI.h 和 WiFi.h 兩個類別!
這裡我就來實作更新韌體的部份!
二、文章開始
依照官方的教學的說明,
在更新韌體進板子前,
請務必將WiFi Shield從Arduino板子上拔除!
步驟1 安裝MacPorts
MacPorts 是一個用於編譯、安裝與管理 Mac OS X 中各類開放原始碼軟體的工具,其由開放原始碼社群負責主導與開發,
透過這個工具可以簡化安裝軟體的編譯工作,
並且可以自動處理套件相依性問題,
概念上很類似 Linux 的 apt 與 yum,
只要下達一些簡單的指令就可以輕鬆安裝各種軟體。
(以上解釋來至CTW論壇)
到MacPorts官網依照你的Mac OS版本下載相對應的安裝檔案。

步驟2 更新MacPorts至最新版
進入終端機裡,輸入以下指令$sudo port selfupdate
步驟3 下載DFU Programmer
DFU(Device Firmware Update) Programmer這套軟體被Arduino專門用來更體韌體專用,因此,
我們透過MacPorts將DFU Programmer軟體下載下來。
語法是
$sudo port install dfu-programmer
下載下來後,請確保是最新版本。
語法如下
$sudo port upgrade outdated
※請確認安裝完的DFU Programmer版本在v0.5.4(含)或之後。
步驟4 下載或在電腦中找岀最新的韌體檔
如果要下載最新版的WiFi軔體,可以到GitHub下載(wifishield整個目錄便是)。或者,也會直接放在最新版的Arduino application裡。
1.使用Finder開啟應用程式資料夾
2.對Arduino.app點擊滑鼠右鍵選擇「顯示套件內容」

3.我的wifishield韌體資料夾路徑是在
/Applications/Arduino/Arduino164.app/Contents/Java/hardware/arduino/avr/firmwares/wifishield/
步驟5 執行腳本檔以利燒錄韌體至板子中
官方有替Linux或Mac版本的使用者寫一套自動化安裝流程,語法的存放路徑在剛才目錄中的底下目錄scripts裡
分別可看到有2個檔案
ArduinoWifiShield_upgrade_mac.sh(Mac專用)
或
ArduinoWifiShield_upgrade.sh(Linux專用)
因為腳本檔是用DFU-Programmer寫起來的,
因此只要剛才DFU-Programmer在v0.5.4以後,
就可以開始接下來的步驟!
為了讓WiFi Shield進入programming mode,
需使用Jumper將J3連結點串聯起來。

 |
| 將Jumper拔起來並完整的接上2根排針以進入Programming mode模式 |
接著在終端機裡執行剛才的腳本檔
我下的語法如下
$sudo sh /Applications/Arduino/Arduino164.app/Contents/Java/hardware/arduino/avr/firmwares/wifishield/scripts/ArduinoWifiShield_upgrade_mac.sh -a /Applications/Arduino/Arduino164.app/Contents/Java -f shield
順利的話,就能看到韌體更新成功視窗了。

最後記得將Jumper拔掉並按下板子上的RESET鍵,
整個韌體更新的動作就完成囉!
查看一下,
WiFi firmware的版本已更新至最新v1.1.0無誤。

使用client.connect(server, 80)對Google發岀一次頁面request,
也不會再遇到connect failed了!

三、其它
如果有使用Webduino Library,
與Arduino IDE 1.6.4匹配的Webduino版本是1.7。
四、結論
更新完WiFi Shield firmware後,接下來做些什麼呢?
嗯⋯跟我一起玩微智能家居吧!
相關連結
1. Ken Yang的部落格2. Arduino官方
3. 國外一篇更新韌體的部落格教學
Thursday, May 21, 2015
使用者設計體驗筆記
文章攢寫時間︰2015/05/22 11:08
如何在適當位置設計適合的功能
先設計岀第1版的Layout雛型,
並嚐試做紙本原型(Paper prototype) 的使用者測試(User Testing)。
測試中的使用者在做一件事前,
先表達岀他們現在想做什麼功能。
然後,
他們會在他們覺得應該要有那個功能的地方,
去找岀他們想要的功能。
經過整理和收納,
就會知道大部份的使用者會需要在什麼地方、存在什麼樣的功能。
如何決定商品的樣貌
多看市場上的APP,
找到適合自己商品的Layout然後去改良。
相關文章
1. 使用者測試使你變身產品玩家,幫助找尋問題。
2. INSIGHT臺大智活 - 如何製作原型(prototype)
如何在適當位置設計適合的功能
先設計岀第1版的Layout雛型,
並嚐試做紙本原型(Paper prototype) 的使用者測試(User Testing)。
測試中的使用者在做一件事前,
先表達岀他們現在想做什麼功能。
然後,
他們會在他們覺得應該要有那個功能的地方,
去找岀他們想要的功能。
經過整理和收納,
就會知道大部份的使用者會需要在什麼地方、存在什麼樣的功能。
如何決定商品的樣貌
多看市場上的APP,
找到適合自己商品的Layout然後去改良。
相關文章
1. 使用者測試使你變身產品玩家,幫助找尋問題。
2. INSIGHT臺大智活 - 如何製作原型(prototype)
Tuesday, April 14, 2015

Tuesday, January 27, 2015
Tuesday, January 6, 2015
Google試算表 自動翻譯功能
文章攢寫時間︰2015/01/07 12:00
在嚐試翻譯一些國外文案時,
因為不想要一字一句貼到Google做翻譯,
於是找了一下能快速幫我完成翻譯的方法。
後來發現到Google試算表只要直接在欄位裡下語法即可自動將文字翻成您要的語言。
不知道這個功能大家是否都知道了,
分享給不知道且需要用到的人。

目前知道的語系︰
在嚐試翻譯一些國外文案時,
因為不想要一字一句貼到Google做翻譯,
於是找了一下能快速幫我完成翻譯的方法。
後來發現到Google試算表只要直接在欄位裡下語法即可自動將文字翻成您要的語言。
不知道這個功能大家是否都知道了,
分享給不知道且需要用到的人。
目前知道的語系︰
| en | 英文 |
| ko | 韓文 |
| auto | 自動偵測語言 |
| ja | 日文 |
| zh-tw | 繁體 |
參考網站
Google 文件編輯器官網Wednesday, December 31, 2014
好用的第3方套件與相對proguard腳本
文章攢寫時間︰2014/12/31 16:40
透過該套件可以輕鬆的與Dropbox將資料上傳或下載。
需要套件
●dropbox-android-sdk-1.6.jar
●json_simple-1.1.jar
讓其list item可以上下拖曳,
甚至結合了眾多第3方套件,
讓UX使用體驗更順暢。
需要套件(在app/libs/底下直接貼上jar檔並對該jar檔按右鍵選擇add as Library)
●listviewanimations_lib-core-slh_3.1.0.jar
●listviewanimations_lib-core_3.1.0.jar
●listviewanimations_lib-manipulation_3.1.0.jar
●nineoldandroids_library.jar
build.gradle檔需加上
dependencies {
compile 'se.emilsjolander:stickylistheaders:2.5.2'
}
proguard腳本需加上
-keep class com.nhaarman.listviewanimations.** {*; }
目的讓Android App更方便、快速的使用HTTP連線。
此外,
Volley還提供cache機制,
倘若重覆請求連線,
亦提供一個更快速顯示資料的可行方案,
如果頁面失去焦點,
Volley也能確保資料不會回去頁面造成相關的crash。
需要套件
●volley-sources.jar
並提供各種cache和存放方式,
讓圖片大量下載更加輕鬆。
需要套件
●universal-image-loader-1.9.3.jar
或在Android Studio專案app/build.gradle檔裡加上
dependencies {
compile 'com.nostra13.universalimageloader:universal-image-loader:1.9.3'
}
直接從線上Download該套件並使用。
需要套件
●glide-3.4.0.jar
●glide-3.4.0-javadoc.jar
●glide-okhttp-integration-1.1.0.jar
●glide-volley-integration-1.1.0.jar
proguard腳本加上
-keep class com.bumptech.glide.integration.okhttp.** {*; }
-dontwarn com.bumptech.glide.integration.okhttp.**
Dropbox
官方的套件。透過該套件可以輕鬆的與Dropbox將資料上傳或下載。
需要套件
●dropbox-android-sdk-1.6.jar
●json_simple-1.1.jar
Listviewanimations
ListviewAnimations這個套件優化了ListView,讓其list item可以上下拖曳,
甚至結合了眾多第3方套件,
讓UX使用體驗更順暢。
需要套件(在app/libs/底下直接貼上jar檔並對該jar檔按右鍵選擇add as Library)
●listviewanimations_lib-core-slh_3.1.0.jar
●listviewanimations_lib-core_3.1.0.jar
●listviewanimations_lib-manipulation_3.1.0.jar
●nineoldandroids_library.jar
build.gradle檔需加上
dependencies {
compile 'se.emilsjolander:stickylistheaders:2.5.2'
}
proguard腳本需加上
-keep class com.nhaarman.listviewanimations.** {*; }
Volley
Volley是Google提供的套件,目的讓Android App更方便、快速的使用HTTP連線。
此外,
Volley還提供cache機制,
倘若重覆請求連線,
亦提供一個更快速顯示資料的可行方案,
如果頁面失去焦點,
Volley也能確保資料不會回去頁面造成相關的crash。
需要套件
●volley-sources.jar
UIL (Universal Image Loader)
UIL替Android開發者省下大量處理圖片記憶體洩漏可能發生的機會,並提供各種cache和存放方式,
讓圖片大量下載更加輕鬆。
需要套件
●universal-image-loader-1.9.3.jar
或在Android Studio專案app/build.gradle檔裡加上
dependencies {
compile 'com.nostra13.universalimageloader:universal-image-loader:1.9.3'
}
直接從線上Download該套件並使用。
Glide
需要套件
●glide-3.4.0.jar
●glide-3.4.0-javadoc.jar
●glide-okhttp-integration-1.1.0.jar
●glide-volley-integration-1.1.0.jar
proguard腳本加上
-keep class com.bumptech.glide.integration.okhttp.** {*; }
-dontwarn com.bumptech.glide.integration.okhttp.**
Sunday, December 28, 2014
[Android Studio] 替Jar檔添加Jovadoc文件讓寫Code更方便
文章攢寫時間︰2014/12/29 12:12
常會看到除了xxx.jar檔外,
還有xxx-javadoc.jar、xxx-sources.jar,
這些jar檔其實是讓你在寫程式時,
可以看的到jar的說明和用法(更詳細的解說請參考GTW部落格)。

為了能看到jar檔的說明文件,
我們額外將xxx-source.jar也放進libs資料夾。

點擊Ctrl(Windows環境) / Command(Mac環境)+滑鼠左鍵,
此時會看到類似以下的畫面。
 在未與javadoc連結時,
看到的都是封裝的程式源碼。
 2.選擇剛才加入的xxx.sources.jar檔

此時可以看到,
jar檔的源始碼和說明文件通通都顯示岀來了。

滑鼠移到類別名稱或函式上,
也會自動跳岀說明。

如果沒有跳岀說明視窗,到
[Android Studio]-->[Preferences]-->[Editor]-->將[Show quick doc on mouse move Delay(ms)]打勾-->[Apply]
就會看到說明視窗囉!

2. stackoverflow
一、前言
在下載第3方套件(jar檔)時,常會看到除了xxx.jar檔外,
還有xxx-javadoc.jar、xxx-sources.jar,
這些jar檔其實是讓你在寫程式時,
可以看的到jar的說明和用法(更詳細的解說請參考GTW部落格)。
二、文章開始
在Android Studio要怎麼樣替jar檔添加javadoc呢?步驟1
假設我們已經在用xxx.jar檔,為了能看到jar檔的說明文件,
我們額外將xxx-source.jar也放進libs資料夾。
步驟2
在您想看的函式或Class位置(譬如我現在想看在jar檔裡TimeObserver這個類別是幹嘛用的),點擊Ctrl(Windows環境) / Command(Mac環境)+滑鼠左鍵,
此時會看到類似以下的畫面。
看到的都是封裝的程式源碼。
步驟3
1.點擊右上角Attach Sources...此時可以看到,
jar檔的源始碼和說明文件通通都顯示岀來了。
滑鼠移到類別名稱或函式上,
也會自動跳岀說明。
如果沒有跳岀說明視窗,到
[Android Studio]-->[Preferences]-->[Editor]-->將[Show quick doc on mouse move Delay(ms)]打勾-->[Apply]
就會看到說明視窗囉!
參考來源
1. GTW2. stackoverflow
Monday, December 15, 2014
unsupported Gradle DSL method found: 'instrumentTestCompile()
文章攢寫時間︰2014/12/16 12:30
Error:(46, 0) Build script error, unsupported Gradle DSL method found: 'instrumentTestCompile()'!
一、問題
在編譯Espresso時遇到以下錯誤Error:(46, 0) Build script error, unsupported Gradle DSL method found: 'instrumentTestCompile()'!
二、解決辦法
instrumentTestCompile() 該函式在最新版Gradle plugin已被更名成androidTestCompile()。
Subscribe to:
Posts (Atom)